Angular
Integrating with an Angular project couldn't be easier, and this guide will show you how it's done.
Before we get started, make sure you've created a project. For this guide, we'll be using e-commerce data to populate a list of products in an Angular component. Check out some of our starter projects if you want to get going quickly with an example.
Setting up your Angular project
First you'll have to install the Angular CLI. Open the console in any directory and enter this:
npm install -g @angular/cli
Next, navigate to the directory where you keep your projects and use the Angular CLI to create a new app:
ng new your-app-name
Depending on the version of Angular you're using, the CLI will ask you certain questions about the configuration of your project. None of these questions will impact how well this guide works for you, so answer them however you'd like.
Open your project in your favorite IDE, and you'll notice that by default it's configured with TypeScript. This documentation will proceed with instructions assuming you're using TypeScript, but all the information is valid if you're using vanilla JavaScript as well.
Now let's test that your project is working before we make any changes. Navigate to your project's directory and enter ng serve --open into the console.
Angular will serve your project on a localhost port without building it. By adding --open, your browser will automatically open to the homepage of your project.
Connecting your project
To connect to your project, you need your API Endpoint and an API key.
If you haven't created a project yet, follow this guide to do so.
If you already have a project, your API Endpoint will be in the admin UI. In the home tab, look for the "Useful Snippets" section.
Copy the API Endpoint and save it somewhere secure.
To get an API Key, you'll have to create one. Read our docs on creating an API Key here.
API keys used in frontend applications are exposed to the browser, even if you use environment variables. When you create an API Key, always use the fewest permissions necessary for your application. Learn more in our permissions guide.
Installing dotenv
If you'd like to use environment variables in Angular, you'll need a package like dotenv to expose the environment variables to your code.
Run npm install dotenv in your command line.
Next, create a file in the root directory of your project called .env. This will be a text file where you store your endpoint and key. Open this file up and add the following text to it:
API_ENDPOINT=paste-your-endpoint-here
API_KEY=paste-your-key-here
Okay, we can now connect your project. All that's left is to actually build it. Continue below to see how to add queries to your Angular components and services.
Creating an Angular service
First, let's create a Service in your Angular project that will fetch data from your project.
In the root directory of your project, open up the console and enter ng g service products.
There will be a products.service.ts file in src/app/. Replace the contents with an empty class like this:
- JavaScript
- TypeScript
@Injectable({
  providedIn: 'root'
})
export class ProductsService {

  constructor(private http: HttpClient) { }

}
@Injectable({
  providedIn: 'root'
})
export class ProductsService {

  constructor(private http) { }

}
Our service is a class, so to make it get a list of products from our Ecommerce backend, we have to define a method. We'll call it getProducts.
To execute an http request from our service, we need to import several Http classes from angular. Follow along with the code below:
- JavaScript
- TypeScript
import { Injectable } from '@angular/core';
import { HttpClient } from '@angular/common/http';
import { HttpHeaders } from '@angular/common/http';
require('dotenv').config()

@Injectable({
  providedIn: 'root'
})
export class ProductsService {

  constructor(private http: HttpClient) { }

  getProductList() {
    const headers = new HttpHeaders()
    .set('content-type', 'application/json')
    .set('Authorization', `Bearer ${process.env.API_KEY}`)

    return this.http.post<any>(`${process.env.API_ENDPOINT}`,
        {"query":`query{
          getProductList{
            items{
              price
              name
              _id
            }
          }
        }`},
        {headers});
  }
}
import { Injectable } from '@angular/core';
import { HttpClient } from '@angular/common/http';
import { HttpHeaders } from '@angular/common/http';
require('dotenv').config()

@Injectable({
  providedIn: 'root'
})
export class ProductsService {

  constructor(private http) { }

  getProductList() {
    const headers = new HttpHeaders()
    .set('content-type', 'application/json')
    .set('Authorization', `Bearer ${process.env.API_KEY}`)

    return this.http.post(`${process.env.API_ENDPOINT}`,
        {"query":`query{
          getProductList{
            items{
              price
              name
              _id
            }
          }
        }`},
        {headers});
  }
}
As you can see in the above code, our getProducts method creates HttpHeaders with an Authorization property that we add a Bearer Token to. Your token will be your API Key, imported from your environment variables thanks to dotenv.
To configure dotenv in this service, you place require('dotenv').configure() near the top of your file, as shown in the above example.
The getProducts method executes a POST request on your API Endpoint. To query your API Mesh, you must add the "query" property to the body of your request, then define that property's value as the query you wish to run.
Our example query in the above code requests a full list of all products in our store, along with the price, name, and _id.
With this set, we'll be able to easily make any query we want in any Service we can think of. If you know how to add code from a service into a component, you're good to go.
Otherwise, continue to the next section.
Creating an Angular component
Let's return to our products.service.ts file. We'll need to add an interface to the service, because our project needs to know the shape of the data we'll be receiving from our API Mesh. This is a feature of TypeScript. To learn more, read the TypeScript docs. If you aren't using TypeScript, no need to create an interface.
For our purposes, open the products.service.ts file, and add the following code above your class:
export interface Product {
  name: string;
  price: number;
}
The overall file should look like this:
- JavaScript
- TypeScript
import { Injectable } from '@angular/core';
import { HttpClient } from '@angular/common/http';
import { HttpHeaders } from '@angular/common/http';
require('dotenv').config()

export interface Product {
  name: string;
  _id: string;
  price: number;
}

@Injectable({
  providedIn: 'root'
})
export class ProductsService {

  constructor(private http: HttpClient) { }

  getProductList() {
    const headers = new HttpHeaders()
    .set('content-type', 'application/json')
    .set('Authorization', `Bearer 7b9171f34e104aeba972941bcfb7767d`)

    return this.http.post<any>('api.takeshape.io/project/6cdbcc52-5697-475b-872e-fcb6fd0e00d0/graphql',
        {"query":`query{
          getProductList{
            items{
              price
              name
              _id
            }
          }
        }`},
        {headers});
  }
}
import { Injectable } from '@angular/core';
import { HttpClient } from '@angular/common/http';
import { HttpHeaders } from '@angular/common/http';
require('dotenv').config()

@Injectable({
  providedIn: 'root'
})
export class ProductsService {

  constructor(private http) { }

  getProductList() {
    const headers = new HttpHeaders()
    .set('content-type', 'application/json')
    .set('Authorization', `Bearer 7b9171f34e104aeba972941bcfb7767d`)

    return this.http.post('https://api.takeshape.io/project/6cdbcc52-5697-475b-872e-fcb6fd0e00d0/graphql',
        {"query":`query{
          getProductList{
            items{
              price
              name
              _id
            }
          }
        }`},
        {headers});
  }
}
Now let's create an Angular component. At the root of your project, enter ng g component products in the console.
A folder called products will be added to your src/app directory, with the html, css and javascript files necessary to build a component inside. In the products.component.ts file, you need to import both the ProductsService class and Product interface. You then need the Component and OnInit classes from Angular.
- JavaScript
- TypeScript
import { Component, OnInit } from '@angular/core';
import { Product, ProductsService } from '../products.service';
import { Component, OnInit } from '@angular/core';
import { Product, ProductsService } from '../products.service';
Now you need a javascript decorator to define the properties of your component. Read the angular docs for more information.
- JavaScript
- TypeScript
@Component({
  selector: 'app-products',
  templateUrl: './products.component.html',
  styleUrls: ['./products.component.css']
})
@Component({
  selector: 'app-products',
  templateUrl: './products.component.html',
  styleUrls: ['./products.component.css']
})
Finally, we'll define our component class. We have to use Angular's ngOnInit method to call the getProducts method we defined in our ProductsService class. This will give your component access to the data retrieved with getProducts.
- JavaScript
- TypeScript
export class ProductsComponent implements OnInit {
  public products:Product[] = [];

  constructor(private productsService: ProductsService) {}

  ngOnInit(): void {
    this.productsService.getProductList().subscribe(
      (response) => {
       this.products = response.data.getProductList.items
      },
      (error) => {
        console.log(error);
      }
    );
  }
}
export class ProductsComponent implements OnInit {
  public products = [];

  constructor(private productsService) {}

  ngOnInit(){
    this.productsService.getProductList().subscribe(
      (response) => {
       this.products = response.data.getProductList.items
      },
      (error) => {
        console.log(error);
      }
    );
  }
}
In the above code, not that we're setting this.products to an array of data retrieved from our project. Because our Products component is a class in which we've defined products as an array, the component itself will have a products property which contains the data we've retrieved. That's why later, in the component's HTML template, we'll be able to display that data.
The final file should look like this:
- JavaScript
- TypeScript
import { Component, OnInit } from '@angular/core';
import { Product, ProductsService } from '../products.service';

@Component({
  selector: 'app-products',
  templateUrl: './products.component.html',
  styleUrls: ['./products.component.css']
})
export class ProductsComponent implements OnInit {
  public products:Product[] = [];

  constructor(
    private productsService: ProductsService) {

    }

  ngOnInit(): void {
    this.productsService.getProductList().subscribe(
      (response) => {
       this.products = response.data.getProductList.items
      },
      (error) => {
        console.log(error);
      }
    );
  }
}
import { Component, OnInit } from '@angular/core';
import { Product, ProductsService } from '../products.service';

@Component({
  selector: 'app-products',
  templateUrl: './products.component.html',
  styleUrls: ['./products.component.css']
})
export class ProductsComponent implements OnInit {
  public products = [];

  constructor(
    private productsService) {

    }

  ngOnInit(){
    this.productsService.getProductList().subscribe(
      (response) => {
       this.products = response.data.getProductList.items
      },
      (error) => {
        console.log(error);
      }
    );
  }
}
Creating an Angular template
The previous section created a class that fetches products then assigns that data to the class's products array. This array will be available in our component template to be displayed on the rendered page.
To access the data in your template, go to your products.component.html file. You can structure this file any way you want. Ours will be simple for this example.
<p>
    This page is a list of info about all the products in our store.
</p>
<h2>
    Products:
</h2>
<router-outlet></router-outlet>
After the <h2> in our above code, we'll insert a div for each product we retrieved in our getProducts method.
<div>
    <div *ngFor="let product of products">
        <h3>{{product.name}}</h3>
        <p>Price: {{product.price}}</p>
    </div>
</div>
The final file should look like this:
<p>
    This page is a list of info about all the products in our store.
</p>
<h3>
    Products:
</h3>
<div>
    <div *ngFor="let product of products">
        <h3>{{product.name}}</h3>
        <p>Price: {{product.price}}</p>
    </div>
</div>
<router-outlet></router-outlet>
Now to build and serve your project, enter these commands into the console:
ng build
ng serve
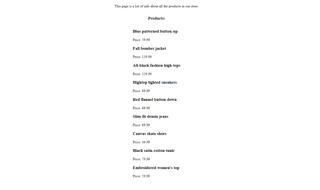
The page should look like this:
Still need help? Get in touch with us.