Create a Project
This guide covers project creation via the admin UI, CLI, and starter projects.
The first step, is logging in.
Web Interface
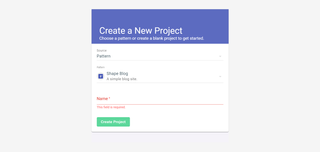
Choosing a Name
A name is required to create a project. Don't worry too much about the name, though; it can be changed at any time in the project settings menu.
Choosing a Source

A source is required to create a project. Choosing a source allows you to either create a project from scratch, or base your project on a project or pattern. Any code contained in your source will be automatically added to your project's schema.
Your source can be a project at a URL endpoint, a project in a zip file, a blank project with no defaults, or one of pre-defined patterns.
-
Pattern - Pre-defined Patterns automatically add relevant queries and mutations to your schema. For example, the Shape Shop Pattern will add queries and mutations useful for e-commerce solutions. For more information, see our Pattern article.
-
Blank Project - Best for new projects that don't fit a common use-case. You should look through the Patterns before choosing this. If none suit your needs, this option will start you with a clean project schema.
-
URL - Best option for importing a pattern from the Pattern Repo, or importing a project you already have hosted at a URL endpoint.
-
Upload Zip - Best option for experienced users who have exported projects stored locally on their PC.
Starter Projects
If you need a more plug-and-play solution, try one of our Starter Projects.
Starter projects allow you to immediately create a project with a schema custom-built to your use-case. Making a Shopify lookbook? There's a starter project for that. Making a portfolio? There's a starter project for that. Starter projects also include pre-written front-end code for popular frameworks like React, Next.js, Gatsby.js and more.
Select Starter Projects in the navbar from the homepage to get started.
Choosing a starter project

From the Starter Project gallery, choose which starter project suits your needs best and select the Use starter button.
You'll be taken to a page where you can set the name of your project. A name is required, but you can change it at any time. There will be a default name provided.
Select the Deploy to button.
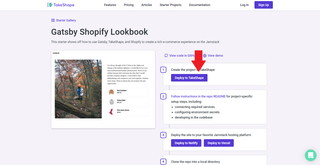
You'll see a page that describes the pattern that your project will use. You must be logged in to continue from here. If you are logged in, an Add To Project button should appear below the project name.
Set the project name to whatever you would like, and select the Add To Project button.

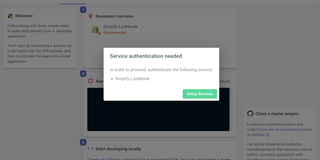
Service authentication warning
Depending on which pattern you chose, you may be taken to a page with a popup modal that says "Service authentication needed. To proceed, authenticate the following service:".
That's normal behavior. When you add a service to your project, you have to set it up by providing certain information. This information varies based on the service and your use-case. See our docs on services to resolve this issue.
Project Repos
We're constantly creating new starter projects that you can build locally, and project patterns that you can deploy with a single button click. These patterns are projects pre-configured with all the settings you need to try out various features, like API Indexing or Apollo code generation.
Here's a list of our starter projects and pattern repos on Github. Check back often. We're adding new entries all the time.
Service Integrations
These projects are built have external services dependencies.
Patterns:
NextJS Projects:
React Projects:
Gatsby:
- Shopify
- Portfolio
Frontend Applications
These projects demonstrate calling a project's API from a frontend application.
Static Site Generators
These projects demonstrate building static sites by fetching API data in the build process with some of the most popular SSG's.
Pattern Projects
These projects are built with starter patterns.
Ship SSG (Ship SSG):
Other SSGs:
CLI
You cannot currently create a blank project from the CLI. To use your blank project with the CLI, create a new project through the Web Interface or with a Starter Project. Then follow our CLI guide to link your project to the CLI.
Creating a project with the CLI
If you have a project, or if you want to import a project from a URL endpoint, you can do either through the CLI.
Use npm in your terminal to install the CLI as a global utility:
npm install -g @takeshape/cli
After this process is done, run takeshape -v. If your installation was a success, this command will return the installed version number.
Logging in through the CLI
To import a project or schema through the CLI, you must first log in. Use the login command.
takeshape login
The login page should open up in your default browser:

If you're using an adblocker, or a browser with heightened security like Brave, the CLI may have trouble connecting. Try setting a different browser to your default. Otherwise, you can log in without the browser by following the instructions below.
Logging into the CLI without opening the browser
You may have trouble logging in through the web interface after using the login command in the CLI for various reasons. To log in while staying in the terminal, use the flag --cliLogin. For example:
takeshape login --cliLogin
You will first be prompted for your email, and then your password.

After that, you must have successfully logged in. If this process fails, check that you have an account, and that your email and password are correct.
If your account uses Sign in with Google, you'll need to create a password before logging in from the CLI. You can do this by triggering a password reset from the login screen using "Forgot your password?" link, then providing your Google account's email in the password reset form.
Importing a project
There are two ways to import a project through the CLI: From a URL or from a locally stored zip file.
Importing a project from a URL
Use the takeshape import --project --from command to import a project from a url. For example:
takeshape import --project --from https://github.com/takeshape/patterns/tree/main/shopify-lookbook
You should see a message that says Success! Created project [id] from import.

If it fails, you'll see a message like Failed to read data.jsonl: Response code [code] [message].

Based on the HTTP status code in the failure message, you can troubleshoot what the problem is. For example if the code is 404 with a message of Not Found, then likely your URL is wrong, or the endpoint is not accessible.
You can read more about http status codes here.
Importing a project from a zip file
Use the takeshape import --project --from command to import a project from a zip file. You will need to specify the relative path from wherever the terminal is running. For example:
takeshape import --project --from ./utils/custom-project.zip
You should see a message that says Success! Created project [id] from import.

If it fails, you'll see a message like Error ENOENT: no such file or directory, stat 'path/to/file.zip'.

Your failure message may vary based on the error you're having. Ensure that your zip file is in the file location you specified, and that the zip file contains a valid project or pattern.
Still need help? Get in touch with us.