Getting started
This doc will walk you through how to set up 11ty to work with your project's GraphQL API.
First, you'll need to create an API key and note your API endpoint.
To connect to your project, you need your API Endpoint and an API key.
If you haven't created a project yet, follow this guide to do so.
If you already have a project, your API Endpoint will be in the admin UI. In the home tab, look for the "Useful Snippets" section.
Copy the API Endpoint and save it somewhere secure.
To get an API Key, you'll have to create one. Read our docs on creating an API Key here.
Creating the 11ty project
Follow along with this guide by checking out our starter project repo. Our starters let you instantly deploy a pre-configured project.
Otherwise, you can use one of 11ty's starter projects.
Our 11ty Starter is based on 11ty's base blog starter, which you can find here.
Whether you use a starter or not, you can install 11ty with the following command:
npm install -g @11ty/eleventy
Now navigate to the directory where you'd like your 11ty project to be. Use the following command to create your package.json:
npm init -y
Now you can create your own template files in any of 11ty's supported languages. Here's the full list. When you have your templates made, use the following command:
npx @11ty/eleventy --serve
We recommend you start with our 11ty starter or one of the official 11ty starters.
Adding your API Key and API Endpoint to your config
Configuration files are optional in 11ty projects, but you'll need one to integrate your API. To do so safely, you'll need to create a .env file, which will hide your API Key and API Endpoint from public access.
At the root of your project, create a file called .env. Now inside this file, create environment variables and set them to your API Key and API Endpoint. For example:
API_KEY=1234-5678
API_ENDPOINT=abcd-efg
To access these variables, you will need to use the dotenv npm package. Learn how to do so below. Or skip ahead to updating the build process
Installing and implementing dotenv
Run npm install dotenv in your command line.
In the root directory of your project folder, create a file called .eleventy.js. Learn more about setting this file up with the 11ty config docs.
On the first line of the file, add:
require('dotenv').config();
Now, if you want to import any environment variables into your build scripts, you can use Node's process.env object. Learn more in the Node docs.
Updating the build process
11ty uses JavaScript Data Files to give your templates access to data that is computed or obtained at build time. Read the 11ty docs on data files to learn more about scoping data to specific templates. In this project, we'll be working with a global data file that will available to all of your templates.
To create a global data file, in the root of your project directory you must create a folder called _data. In this directory, you will create a JS module, which you can name whatever you like. For this example we want to simulate pulling a set of products from an ecommerce backend into your project.
We'll call our module products.js.
You can name the _data folder anything you want, but you have to define the custom name of the folder in your .eleventy.js config. Read the 11ty docs for more information.
To query from your API, you'll make a fetch request. You'll need to install the node-fetch npm package, because JavaScript's fetch functionality is not included in Node by default.
npm i node-fetch
With that done, let's start editing our products.js file.
const fetch = require('node-fetch');

const key = process.env.API_KEY;
const endpoint = process.env.API_ENDPOINT;
The above code imports the fetch npm package, then defines our API endpoint as a string template containing the API Endpoint we saved in our local .env file.
Next, define the function that the module will export. Because you'll be interfacing with your project's GraphQL API, this code will be highly dependent on your project's schema.
Check out our docs on configuring your project's schema to learn more.
The below code will show you an example of what your code might look like. You can use it as a starting point for building your own code. It demonstrates interfacing with your project's API through a fetch request, and returning the data you receive.
First, we make a fetch request with the authorization header set to Bearer ${key}. Next, we specify the GraphQL query we want to make in the body of our request.
Read our doc on calling the GraphQL API to learn more.
The important property on the body object will be called query. This property will contain a string with your GraphQL query.
const fetch = require('node-fetch');
const key = process.env.API_KEY;
const endpoint = process.env.API_ENDPOINT;

module.exports = async () => {
  const response = await fetch('YOUR-ENDPOINT-HERE', {
    method: 'POST',
    headers: {
      'Content-Type': 'application/json',
      Accept: 'application/json',
      Authorization: `Bearer YOUR-API-KEY-HERE`,
    },
    body: JSON.stringify({
      query: `query{
        getProductList{
          items{
            name
            price
          }
        }
      }`})
    });
  const responseJSON = await response.json();
  return responseJSON.data.getProductList.items;
};
The above query is an example; our query will be based on the queries and mutations you have defined in your project's schema. If you'd like to test out different queries without having to run a dev server, check out the API Explorer feature in the admin UI.
To query data from project module, insert the below code at the top of your page template:
---
data: products
---
Here's an example of what your whole template could look like:
---
data: products
---

<h1>Products</h1>
<ul>
    {% for product in products %}
      <li>
        {{product.name}}: {{product.price}}
      </li>
    {% endfor %}
</ul>
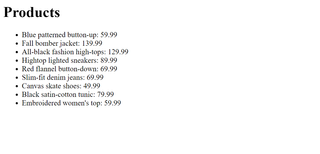
And here's what the final page might look like:
Further Reading
You're all set up. For a more in-depth example of working with 11ty, check out this guide.
Still need help? Get in touch with us.