Auth0
Auth0 adds support for authenticating external users. After adding your Auth0 service to and configuring your application in Auth0, you can create queries and shapes that leverage the data in Auth0-issued JSON Web Tokens. This allows you to tailor your user experience. With relatively little effort you'll have fully functional user accounts on your project.
Follow along with this guide by checking out our starter project repo. Our starters let you instantly deploy a pre-configured project.
Getting started
To get started, you'll need an Auth0 account and an active project. Auth0 provides several sample applications, which can be adapted to connect as an external API. Once everything is configured, Auth0 will issue your application a JWT, which is sent as a Bearer token, validated and made available to your custom queries. Your Auth0 user's passwords won't be shared, and will only be able to read the base and custom claims you make available on your tokens.
Creating an Auth0 application
On your Auth0 management page, go to Applications. Create or edit an application and fill in the appropriate values for your project. The important item to copy from this page is your Auth0 domain. This domain might be your Auth0 account ID, unless you have set up a custom domain.

Creating a service connection
In your project, go to the Home tab and select Connect Service. Choose Auth0 as the service provider and then fill out the configuration screen, using the domain you copied from Auth0.
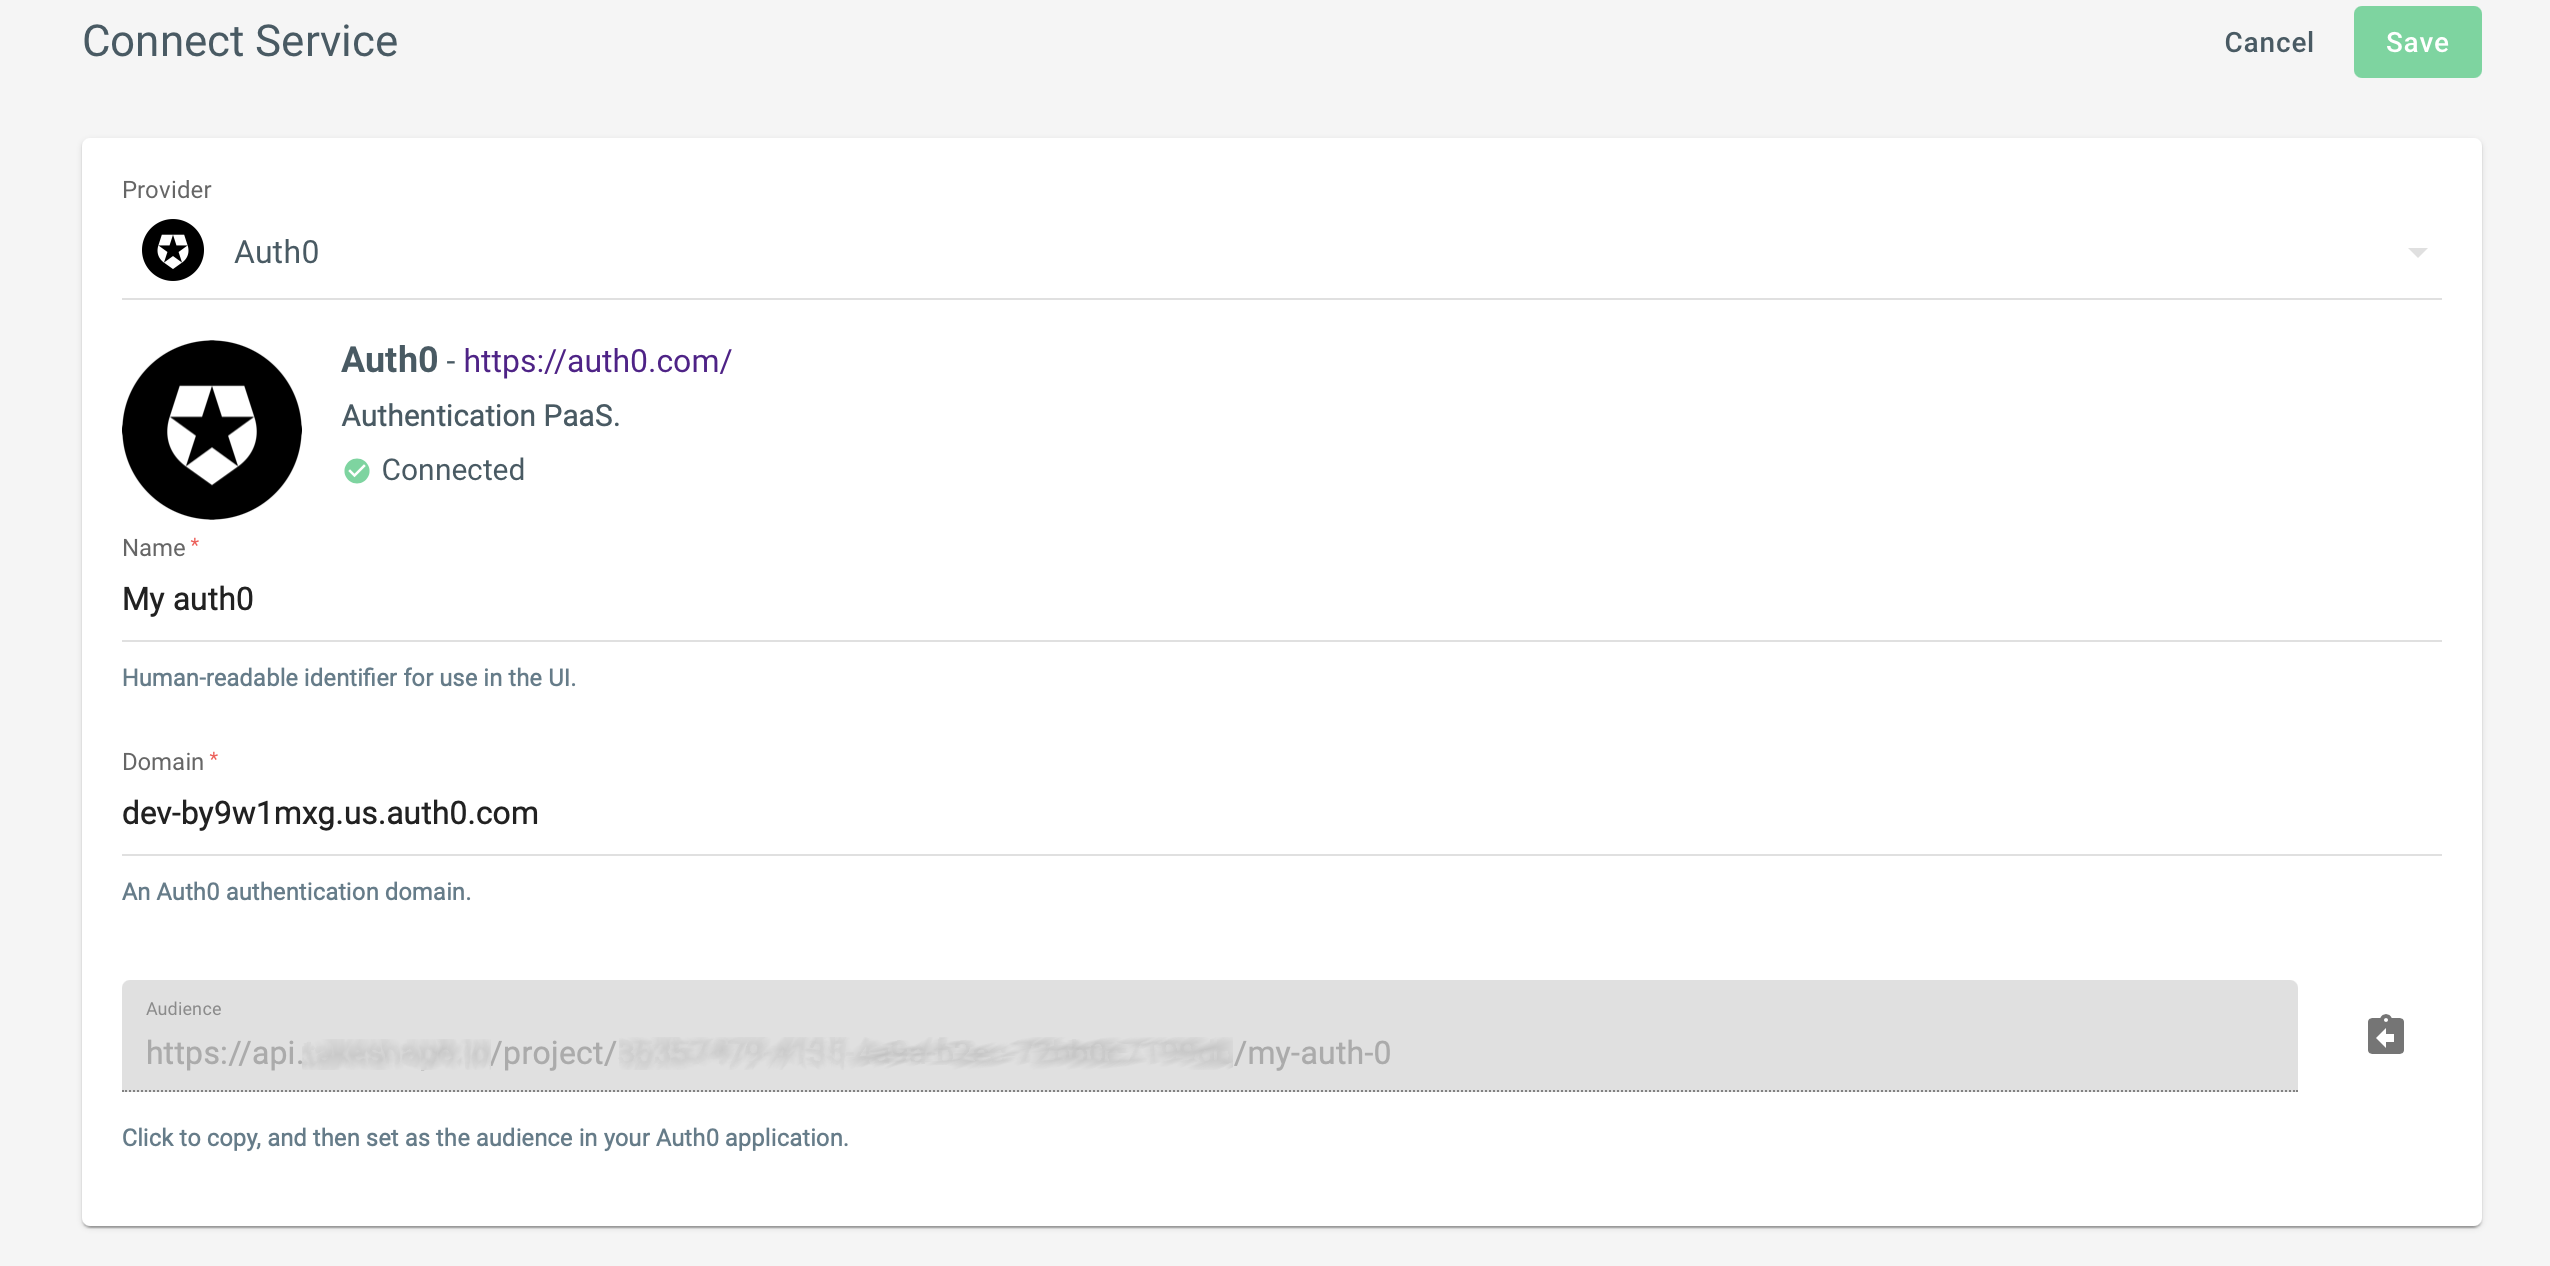
Note an audience has been created for you. You'll need to provide this url to Auth0 to create a unique connection that that can be validated. This audience also contains the name of your newly created service, so if you delete it, you will effectively invalidate all your Auth0 tokens that were signed for this audience. This is an important safeguard to prevent unintended access.
Select save when you've copied the audience and have finished. You can always return to this screen later.
Creating a role for Auth0
In order for your Auth0 connection to provide access to API resources you'll need to create a custom role and add permissions to it. The role conditions ensure that requests with Auth0 claims get this custom role assigned to them. That can be done with this JSON snippet:
{
  "StringEquals": {
    "claims:provider": "auth0"
  }
}
Creating an Auth0 API connection
In Auth0, go to Applications > APIs then select Create API. On the next screen use the audience from the service configuration screen as the Identifier and be sure you use the default RS256 encryption algorithm.

Now you're ready to test your connection. Go to the Test tab for your API connection, and copy the provided curl command shown at the bottom of the page.

Paste the copied command into your terminal and
replace http://path_to_your_api/ with api.takeshape.io/project/PROJECT-ID/auth/me.
Run the edited command.
If the test succeeds your claims will be echoed back to you with additional data used internally to handle the claims.
Running this command uses a special machine-to-machine access token in the request that validates that the service configuration is correct tokens from Auth0 are being processed.
Remember, all the data in a JWT is effectively public, so nothing in this token or in your Auth0 data model should be considered sensitive.
Here's a sample of the request and expected response.

Incorporating Auth0 claims
Your Auth0 token will provide a number of claims. In short, these are data points from your verified Auth0 token. They are customizable, so they won't be the same for everybody, but generally you'll have the base Auth0 claims as well as the userinfo available.
Base claims
A full set of Auth0 base claims might look like this:
{
  "iss": "https://dev-cy9w1mxg.us.auth0.com/",
  "sub": "auth0|60845b2cb1cc580071d093dc",
  "aud": [
    "https://api.takeshape.io/project/5a0614fc-9519-4dbe-976a-99622dc4fe37/auth-0",
    "https://dev-cy9w1mxg.us.auth0.com/userinfo"
  ],
  "iat": 1622670727,
  "exp": 1622757127,
  "azp": "1VyUowW88mxDvmmhWeaSyVv5FJRqE9IK",
  "scope": "openid profile email",
  "sub": "auth0|60845b2cb1cc580071d093dc",
  "nickname": "John Smith",
  "name": "person@example.io",
  "picture": "<gravatar-url>",
  "updated_at": "2021-05-25T13:48:48.540Z",
  "email": "person@example.io",
  "email_verified": true
}
Custom namespaced claims
You also have the ability to add special
namespaced custom claims using the namespace
https://example.com. If you add these claims to your Auth0 token they will be available in a special, nested custom
property. For example, the custom claim https:/example.com/favorite_color will be available as
claims.custom.favorite_color.
Sample use of claims in schema
You can now incorporate Auth0 claims into your schema. The following sample code shows how you might use claims.sub to
prepopulate an ID value for mutating and querying profile data that is stored in a shape called Profile.
{
  "queries": {
    "getMyProfile": {
      "shape": "Profile",
      "resolver": {
        "name": "shapedb:find",
        "service": "shapedb",
        "options": {"model": "Profile"},
        "argsMapping": {"where.id.eq": "get", {"path": "claims.sub"}}
      },
      "description": "Get a profile using a claim."
    }
  },
  "mutations": {
    "createMyProfile": {
      "shape": "Profile",
      "resolver": {
        "name": "shapedb:create",
        "service": "shapedb",
        "options": {"model": "Profile"},
        "argsMapping": {"id": "get", {"path": "claims.sub"}}
      },
      "description": "Create a profile, id'd by a claim.",
      "args": {
        "type": "object",
        "properties": {
          "id": {
            "type": "string"
          },
          "firstName": {
            "type": "string"
          },
          "lastName": {
            "type": "string"
          }
        }
      }
    }
  }
}