BigCommerce
BigCommerce is a popular data source in the ecommerce space, and this guide will show you how to integrate a BigCommerce API into your project.
This guide will demonstrate using the BigCommerce GraphQL Storefront API.
Follow along with this guide by checking out our starter project repo. Our starters let you instantly deploy a pre-configured project.
Don't have a project yet? Check out this guide for setting one up.
Connecting BigCommerce to your project
The first step to connecting BigCommerce is navigating to the admin UI. You'll want to log in and select the project you'd like to connect BigCommerce to.
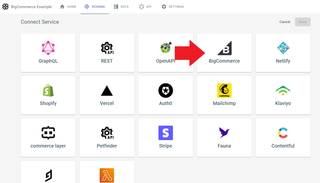
In the home tab of your project's dashboard, at the top, you'll see a section with a button that says "Add a service". Select that button to begin.

Now you'll be presented with a list of services to choose from. Choose BigCommerce.
Next you'll see a form that you'll have to fill out to connect your BigCommerce Storefront API to your project. We're almost done already.

In the Name field, choose the name you'd like to give this service. For the Namespace, choose what you'd like your BigCommerce queries to be prefixed by. For example, if you choose the namespace BigCommerce, your query for getting data a bite your BigCommerce site will be BigCommerce_site.
Now you need to enter your BigCommerce API Path. In a new browser tab, go to your BigCommerce account dashboard. Don't have an account? Sign up for one here.
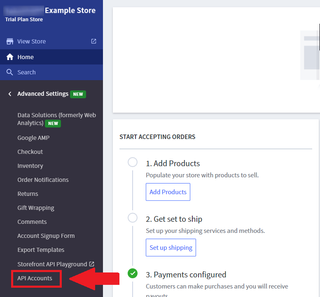
Once you're logged in, and you select the store you'd like to use, you'll see your account options on the left side of the screen. Select Advanced Settings.

Once you select that, you'll see an option for API Accounts. Select this option to begin configuring your store's API.
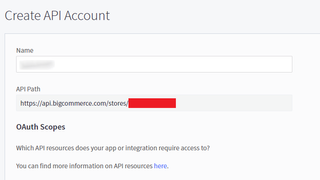
You'll see a page that says Store API Accounts. Near the top will be a button that says Create API Account. Select it, and choose Create V2/V3 API Token from the dropdown menu. You'll see a menu called Create API Account with an input form for the name, with an API Path below it.
Copy the text under API Path, and paste it into your BigCommerce service configuration form in your project.
Switching back to your BigCommerce tab, you should scroll to the bottom of the page to switch your Storefront API Tokens permissions to "manage".

Now hit the save button, and you'll be shown a popup with your access credentials. You'll want to copy the access token, then switch over to your project tab and paste it into the form.

Now scroll to the top of the page in the admin UI, and select Save in the top right.
Your BigCommerce service has been added. But on the next page, you'll be able to add specific queries and mutations from your BigCommerce API. Let's go through that process now.
Adding queries and mutations from BigCommerce
Once you've connected your service, you should immediately be presented with a page listing all the queries and mutations available to you from your BigCommerce API.

Select whichever queries or mutations you'd like to add, then select the Save button in the bottom right. For this example, we'll just add all queries and mutations by hitting the checkbox in the top left.
If you did not see a list of queries and mutations after adding your service, you may have entered some incorrect information. Please start the process over and try again.
Testing your BigCommerce API
Before you build a start integrating your API, test it out in the API Explorer.
From your project's dashboard, select the API tab near the top of your screen. You should see the API Explorer.

Now to test our connection to our BigCommerce API, let's run a simple query. When you start a BigCommerce store, it comes pre-populated with data, as well as queries to access that data.
Let's run a query that will find all products in your store, and list their names, id's, descriptions, images, and prices.
{
  BigCommerce_site{
    bestSellingProducts{
      edges{
        node{
          id
          name
          description
          defaultImage{
            urlOriginal
          }
          prices{
            price{
              value
            }
          }
        }
      }
    }
  }
}
Here's the result we expect:
{
  "data": {
    "BigCommerce_site": {
      "bestSellingProducts": {
        "edges": [
          {
            "node": {
              "id": "UHJvZHVjdDo4Ng==",
              "name": "[Sample] Able Brewing System",
              "description": "<p>Stemming from an intense passion for the most flavourful cup of coffee, Able Brewing set out to create a brewer that was as aesthetically pleasing as it was functional. They imagined a product that would easily find itself at home in your kitchen during your morning routine. A product that would successfully showcase the Kone filter that they had painstakingly perfected. Inspired by Japanese and Mid-Century design, the resulting brewer elegantly serves pour over coffee. The multi-part design allows the top brewer portion to be removed once brewing is complete leaving a single pot server. The all ceramic exterior is dishwasher safe.</p>\n<p>Made in the USA</p>\n<p>Measures 20.3 x 15.2 cm / 8 in x 6 in</p>\n<p>Capacity 946 ml / 32 oz.</p>",
              "defaultImage": {
                "urlOriginal": "https://cdn11.bigcommerce.com/s-nqe8wralz4/images/stencil/original/products/86/286/ablebrewingsystem4.1632953983.jpg"
              },
              "prices": {
                "price": {
                  "value": 225
                }
              }
            }
          },
          {
            "node": {
              "id": "UHJvZHVjdDo4MQ==",
              "name": "[Sample] Orbit Terrarium - Small",
              "description": "<p>This strikingly beautiful terrarium will make a welcome addition to your home bringing some green to the scene. A handblown glass sphere rests freely on a thick, concave carved fir base allowing it to be angled in any direction.</p>\n<p><em>Plants, rocks and soil are not included.</em></p>\n<p>Measures 16.5 cm dia x 17.8 cm h / 6.5 in dia x 7 in h</p>",
              "prices": {
                "price": {
                  "value": 89
                }
              },
              "defaultImage": {
                "urlOriginal": "https://cdn11.bigcommerce.com/s-nqe8wralz4/images/stencil/original/products/81/273/roundterrariumsmall.1632953983.jpg"
              }
            }
          }
        ]
      }
    },
    "name": "graphql:query",
    "path": [
      "BigCommerce_site"
    ],
    "returnType": "BigCommerce_Site",
    "startOffset": 0,
    "children": []
  }
}
We have connected BigCommerce to our project.
But what if you want to display this data in an example project? Well, you can check out our BigCommerce Starter Repo, or you can follow along with the rest of this guide. We're going to show you how to display your BigCommerce products in a React project.
Connecting to your project
To connect to your project, you need your API Endpoint and an API key.
If you haven't created a project yet, follow this guide to do so.
If you already have a project, your API Endpoint will be in the admin UI. In the home tab, look for the "Useful Snippets" section.
Copy the API Endpoint and save it somewhere secure.
To get an API Key, you'll have to create one. Read our docs on creating an API Key here.
Creating a React project
Open your computer's terminal and navigate to the folder where you'd like to keep your project.
Run npx create-react-app bigcommerce-example
Now change directories into the folder you just created. Open the project in your favorite IDE or text editor.
If you want a detailed tutorial, check out our guide on working with React.
Open src/App.js and delete everything inside the component function, except the code that returns an empty div. Your file should look like this:
function App() {
  return (
    <div>

    </div>
  )
}

export default App;
We're going to display a list of products, or an error message if our request fails. We need a state for the list of BigCommerce product's we'll pull from our project, and a state to render an error message.
Import useState and useEffect at the top of your file. Then, in the component function, above the return statement, declare productList and graphQLAPIError as states. See the code below:
function App() {

  const [productList, setProductList] = useState([]);
  const [graphQLAPIError, setGraphQLAPIError] = useState("");

  return (
    <div>

    </div>
  )
}

export default App;
Now to fetch our data as soon as the component renders, we need to use the useEffect react hook. But fetch requests are async functions, and useEffect can have issues when you pass it an asynchronous function. To bypass this, we'll use an IIFE like so:
function App() {

  const [productList, setProductList] = useState([]);
  const [graphQLAPIError, setGraphQLAPIError] = useState("");
  useEffect(() => {
      (async()=>{
        //Fetch code goes here
      })();
  }, []);

  return (
    <div>

    </div>
  )
}

export default App;
Perfect. Now let's add the fetch code inside our IIFE, as shown below:
useEffect(() => {
    (async()=>{
      try{
        const result = await fetch(process.env.REACT_APP_GRAPHQL_ENDPOINT,
            {
              method: 'POST',
              headers: {
                authorization: `Bearer ${process.env.REACT_APP_GRAPHQL_API_KEY}`
              },
              body: JSON.stringify({
                query: `
                  query{
                    BigCommerce_site{
                      bestSellingProducts{
                        edges{
                          node{
                            id
                            name
                            description
                            defaultImage{
                              urlOriginal
                            }
                            prices{
                              price{
                                value
                              }
                            }
                          }
                        }
                      }
                    }
                  }
                `
              })
            }
        );

        const resultJSON = await result.json();
        const { edges } = resultJSON.data.BigCommerce_site.bestSellingProducts

        if(!edges) throw new Error("No products found in your project!");

        setProductList(edges);
      } catch (error) {
        console.log("Error fetching data:", error);
        setGraphQLAPIError(error);
      }
    })()
  }, [])
In the above code, we're making the same query to our API Endpoint that we made in the API Explorer in an earlier section in this doc.
You may have noticed that where the URL goes, we used process.env.REACT_APP_GRAPHQL_ENDPOINT. We recommend storing your sensitive data like the endpoint and API keys for your project in an environment variable. React will only read environment variables that are prefixed with REACT_APP, so we went with that naming convention.
Once we fetch the data, we set our productList state to hold the value of the array of products we received. If there's an error, we set the value to our graphQLAPIError state.
Now we just have to render the products.
First, let's write some code to render an error message if something goes wrong. It's best to write error handling code first, so you never forget to do it.
We want to render an error if graphQLAPIError has been set, or if productList doesn't exist. Here's how we'll render error text in our component function:
return(
  <div>
    {
      graphQLAPIError || !productList &&
      <>
        <h1>Error connecting to GraphQL API:</h1>
        <p>{graphQLAPIError || "Product list empty. Check query."}</p>
      </>
    }
  </div>
)
Now we just need to display our data if everything went well. We're going to do a tiny bit of styling to make everything fit on the page. Other than that, we'll render each piece of data for our product inside div tags. Here's what the full return statement will look like when we're done:
return (
  <div>
    {
      graphQLAPIError || !productList &&
      <>
        <h1>Error connecting to GraphQL API:</h1>
        <p>{graphQLAPIError || "Product list empty. Check query."}</p>
      </>
    }
    {
      !graphQLAPIError && productList &&
      <div style={{margin:'auto', width:'50%'}}>
        <h1>Product List:</h1>
        {productList.map(item=>{
          console.log(item);
          return <div key={item.node.id}
            style={{display:'flex', flexDirection:'column'}}
          >
            <h2>{item.node.name}</h2>
            <img style={{width:"400px", margin:'auto'}}
              src={item.node.defaultImage.urlOriginal}
            ></img>
            <strong>${item.node.prices.price.value}</strong>
            <div dangerouslySetInnerHTML={{__html: item.node.description}}>
            </div>
          </div>
        })}
      </div>
    }
  </div>
);
This should render out our BigCommerce product list.
Here's what the full component should look like:
import './App.css';
import { useState, useEffect } from 'react';

function App() {

  const [productList, setProductList] = useState([]);
  const [graphQLAPIError, setGraphQLAPIError] = useState("");

  useEffect(() => {
    (async()=>{
      try{
        const result = await fetch(process.env.REACT_APP_GRAPHQL_ENDPOINT,
            {
              method: 'POST',
              headers: {
                authorization: `Bearer ${process.env.REACT_APP_GRAPHQL_API_KEY}`
              },
              body: JSON.stringify({
                query: `
                  query{
                    BigCommerce_site{
                      bestSellingProducts{
                        edges{
                          node{
                            id
                            name
                            description
                            defaultImage{
                              urlOriginal
                            }
                            prices{
                              price{
                                value
                              }
                            }
                          }
                        }
                      }
                    }
                  }
                `
              })
            }
        );

        const resultJSON = await result.json();
        const { edges } = resultJSON.data.BigCommerce_site.bestSellingProducts

        if(!edges) throw new Error("No products found in your project!");

        setProductList(edges);

      } catch (error) {
        console.log(error);
        setGraphQLAPIError(error);
      }
    })()
  }, [])

  return (
    <div>
      {
        graphQLAPIError || !productList &&
        <>
          <h1>Error connecting to GraphQl API:</h1>
          <p>{graphQLAPIError || "Product list empty. Check query."}</p>
        </>
      }
      {
        !graphQLAPIError && productList &&
        <div style={{margin:'auto', width:'50%'}}>
          <h1>Product List:</h1>
          {productList.map(item=>{
            console.log(item);
            return <div key={item.node.id}
              style={{display:'flex', flexDirection:'column'}}
            >
              <h2>{item.node.name}</h2>
              <img style={{width:"400px", margin:'auto'}}
                src={item.node.defaultImage.urlOriginal}
              ></img>
              <strong>${item.node.prices.price.value}</strong>
              <div dangerouslySetInnerHTML={{__html: item.node.description}}>
              </div>
            </div>
          })}
        </div>
      }
    </div>
  );
}

export default App;
To run the project, enter npm run start from the root directory of the project in your terminal.
Here's what the final page should look like.

Don't forget to check out our starter repo to run this project yourself.
Still need help? Get in touch with us.