Working with Apollo Client
One of the best ways to integrate your project into your codebase is with Apollo Client.
In this guide, you'll learn how to use Apollo to generate types based on your project's schema to run queries and mutations from your project.
Let's get started.
Follow along with this guide by checking out our starter project repo. Our starters let you instantly deploy a pre-configured project.
Setting up your Project and Environment
To run the code used in this doc, you'll need to create a react app with TypeScript. The simplest method for this is to use the create-react-app CLI. To do so, open a directory where you keep your projects, and enter the following command into your terminal:
npx create-react-app app-name-here --template typescript
The next thing you'll need is a starter project. This project uses the Apollo Codegen Starter pattern. You can use it create an example project to use for this guide, or follow along with your own project.
Getting your API Endpoint and API Key
Next, you'll need your API endpoint and key to connect to your project.
If you haven't created a project yet, you can do that by following our docs on the subject.
If you already have a project, you'll find the API Endpoint on the admin UI. In the home tab, look in the bottom left of your screen for a section called "Useful Snippets".
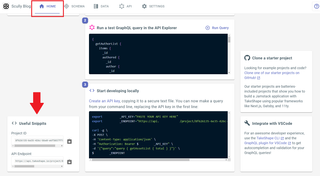
You want the API Endpoint. Copy that and save it somewhere so you can use it in your code.
To get an API Key, you'll have to create one. Read our docs on creating an API Key here. Be sure to give it read privileges only, since there's no way to hide it in your React app, even if you use environment variables.
API keys used in frontend applications are exposed to the browser, even if you use environment variables. When you create an API Key, always use the fewest permissions necessary for your application. Learn more in our permissions guide.
Installing the Apollo libraries
The first of the many libraries you'll need is the @apollo/client library. Enter this into your console:
npm i @apollo/client
Now we need the libraries for the Apollo CLI.
At the time of writing, you'll need to install a specific version of the Apollo CLI to be able to use its codegen features. Check out this Github conversation to learn more.
To install the appropriate version for this project manually, enter the following command into your console:
npm i -D apollo@2.33.4 apollo-language-server@1.26.3
Once you have those added to your project, install the GraphQL types package:
npm i -D @types/graphql
Now let's get started.
Working with Apollo's Codegen
Fetching your API Mesh schema
Apollo's CLI has tools for pulling a GraphQL schema from an endpoint, and then converting that schema into types for your TypeScript code. To start the process, you first need to pull the schema down from your project.
If you haven't already, make sure you get your API endpoint and API key—you'll need them. (Go here to learn more)[#getting-your-api-endpoint-and-api-key].
The command for pulling your schema down is:
npx apollo service:download --header "Authorization: Bearer YOUR-KEY-HERE" --endpoint=YOUR-ENDPOINT-HERE graphql-schema.json
This command should generate a graphql-schema.json file in the root directory of your React project. Didn't work? Check out this Github discussion for potential solutions.
Now, to convert these into types, we need to define some actual queries.
Creating queries
In your src directory, create a new directory called queries. Inside, create a file called starterProducts.ts.
You should export a query from this file. It should look like this:
import { gql } from '@apollo/client';

export const starterProductsQuery = gql`
  query StarterProducts {
    getProductList {
      items {
        _id
        name
        price
      }
    }
  }
`;
This is the most organized way to define the queries you'll use in your project. You could of course define your queries directly in your components, but this will keep that code separated and stored in one place.
Regardless of where you keep your queries, you need to have them defined somewhere within your project for Apollo's codegen to generate types for it.
Apollo's type generator only generates types for the queries you actually use.
Open up your terminal and enter the following command:
npx apollo codegen:generate --localSchemaFile=graphql-schema.json --target=typescript --tagName=gql
In the above command, you can swap out graphql-schema.json for whatever the name of your schema file is. You may already have a schema file in your project, or you may have pulled it from your project's endpoint. Either way, you'll need to tell the CLI what the name of the schema file is.
If all goes well, you should see __generated__ folder in both your queries directory and at the top level of your src directory. If it doesn't go well, check out this Github conversation for a possible solution.
Only define your queries in one place in your project. If they're defined twice, the Apollo CLI will throw an error when you try to generate your types.
Now you've got your types based on your project's schema. Read below to see an example of how to use these Types in a project. And check out our Apollo starter repo to see this example in action.
Working with the Apollo Codegen Example
Here's a concrete demonstration of how you would use your project with Apollo's codegen functionality to generate TypeScript types based on your API Mesh shapes.
First, you'll need to create a React app to follow along. You can jump to this section to see how we recommend you doing that.
Open up a folder with where you'd like to keep your project, and run one of the following commands in your terminal:
npx create-react-app app-name-here --template typescript

# or

yarn create react-app app-name-here --template typescript
Now change directories into your project or open it in your favorite IDE. Open the console from within the project directory and install the following dependencies:
npm i -D apollo@2.33.4 apollo-language-server@1.26.3 @types/graphql
Finally, install apollo client:
npm i @apollo/client.
Configuring Apollo
We're going to rapidly move through this example for the sake of focusing on the code. If you want to see a more detailed breakdown of using Apollo with React, check out the official documentation.
Navigate to the index.ts file in your src folder. We need to import the following: ApolloClient, InMemoryCache, ApolloProvider. Our first goal is to create an Apollo client object:
import React from 'react';
import ReactDOM from 'react-dom';
import './index.css';
import App from './App';
import reportWebVitals from './reportWebVitals';
import { ApolloClient, InMemoryCache, ApolloProvider, gql } from '@apollo/client';

const client = new ApolloClient({
  uri: process.env.REACT_APP_GRAPHQL_ENDPOINT,
  cache: new InMemoryCache(),
  headers: {
    Authorization: `Bearer ${process.env.REACT_APP_GRAPHQL_API_KEY}`
  }
});
You may have noticed strings in the above code where you can insert your endpoint and API key. To get both these things, check out our explanation above. Otherwise, add this information to the above code snippet.
The rest of the code just needs to wrap our <App/> component in the <ApolloProvider> component, so we can expose our client to our app.
ReactDOM.render(
  <React.StrictMode>
    <ApolloProvider client={client}>
      <App />
    </ApolloProvider>
  </React.StrictMode>,
  document.getElementById('root')
);
The whole file should look like this:
import React from 'react';
import ReactDOM from 'react-dom';
import './index.css';
import App from './App';
import reportWebVitals from './reportWebVitals';
import {ApolloClient, InMemoryCache, ApolloProvider, gql} from '@apollo/client';

const client = new ApolloClient({
  uri: process.env.REACT_APP_GRAPHQL_ENDPOINT,
  cache: new InMemoryCache(),
  headers: {
    Authorization: `Bearer ${process.env.REACT_APP_GRAPHQL_API_KEY}`
  }
});

ReactDOM.render(
  <React.StrictMode>
    <ApolloProvider client={client}>
      <App />
    </ApolloProvider>
  </React.StrictMode>,
  document.getElementById('root')
);
Now we're ready to make some queries. Follow the instructions in this section above to create your query. The TLDR is:
- Create a
queriesfolder in yoursrcdirectory - Create a
starterProducts.tsfile inside that folder
Inside this file, include the following:
import { gql } from '@apollo/client';

export const starterProducts = gql`
  query StarterProducts {
    getProductList {
      items {
        _id
        name
        price
      }
    }
  }
`;
Now we'll pull our schema from the project.
For this example, we're using the Apollo Codegen starter pattern. To learn more about pulling your schema from your project, read our section on it above.
Otherwise, enter the following code into your terminal from your React project directory:
npx apollo service:download --header "Authorization: Bearer YOUR-KEY-HERE" --endpoint=YOUR-ENDPOINT-HERE graphql-schema.json
Once that's done, run this command in your terminal:
npx apollo codegen:generate --localSchemaFile=graphql-schema.json --target=typescript --tagName=gql
You must have a graphql-schema.json file in the root of your project directory, and a __generated__ folder in both your src directory and your queries directory.
If anything goes wrong, or you need a more detailed breakdown, read our section on this above.
Now, let's go to our App.tsx file.
We're going to create a component that queries a list of products from your project and displays it as a bulleted list.
import {useQuery} from '@apollo/client';
import {starterProducts} from './queries/starterProducts';

function App() {
  const {loading, error, data} = useQuery(starterProducts);

  return <div>Nothing.</div>;
}
Apollo's useQuery returns two booleans and a data object, which are all updated when the query is done executing. We'll use them to conditionally render our component.
First, we need to put a type on our query so we know the actual shape of our data. Import your auto-generated type from the __generated__ folder. In our case, we want getProductList.
import {useQuery} from '@apollo/client';
import {starterProducts} from './queries/starterProducts';
import {getProductList, starterProducts_getProductList_items} from './__generated__/getProductList';

function App() {
  const {loading, error, data} = useQuery<getProductList>(starterProducts);

  return <div>Nothing.</div>;
}
You'll notice in the above code, we're also importing an interface called StarterProducts_getProductList_items. We're using this interface because we're going to be taking the items returned from the StarterProducts query we defined earlier and rendering them into our component. These generated names may appear cumbersome at first, but the naming scheme is important for distinguishing between different operations over the same fields. If we later add a more detailed product view, for example, we might have a ProductDetails_getProductList_items type that includes properties beyond name and price.
Open up your __generated__/getProductList.ts file. It will look like this:
/* tslint:disable */
/* eslint-disable */
// @generated
// This file was automatically generated and should not be edited.
// ====================================================
// GraphQL query operation: starterProducts
// ====================================================

export interface starterProducts_getProductList_items {
  __typename: 'Product';
  _id: string | null;
  name: string;
  price: number;
}

export interface starterProducts_getProductList {
  __typename: 'ProductPaginatedList';
  items: (starterProducts_getProductList_items | null)[] | null;
}

export interface getProductList {
  /**
   * Returns a list Product in natural order.
   */
  getProductList: starterProducts_getProductList | null;
}
Now jump back to App.tsx.
To render out a list of Products pulled from our project, our final component will look like this:
import {useQuery} from '@apollo/client';
import {starterProducts} from './queries/starterProducts';
import {getProductList, starterProducts_getProductList_items} from './__generated__/getProductList';
function App() {
const {loading, error, data, fetchMore} = useQuery<getProductList>(starterProducts);
return (
<div className="App">
{loading && <h1>Loading, please wait...</h1>}
{error && <h1>Failed to fetch data</h1>}
{data && (
<>
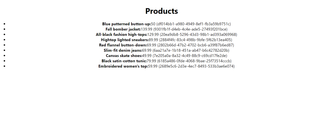
<h1>Products</h1>
<ul>
{data.getProductList?.items?.map((item: starterProducts_getProductList_items | null) => (
<li key={item?._id}>
<b>{item?.name}:</b>
{item?.price} ({item?._id})
</li>
))}
</ul>
</>
)}
</div>
);
}
Run npm run start, and the page should look like the following:
Using Apollo in other applications
Because Apollo works with any frontend framework, and TypeScript works anywhere JavaScript does, you're free to generalize this doc to any use-case. Check out our docs working with Vue and Apollo, for example.
Still need help? Get in touch with us.