Working with Astro
Astro is an amazing new way to statically generate websites that have little or no JavaScript. Just fetch the data you need, create your components using your favorite framework, and you're good to go.
Using our GraphQl API mesh, you can blend data from multiple sources into one convenient GraphQL API, which your Astro project can consume at build time to generate your site.
Let's get started.
Follow along with this guide by checking out our starter project repo. Our starters let you instantly deploy a pre-configured project.
Creating a project
Let's start by setting up a project. If you haven't created a project yet, you can do that by following our docs.
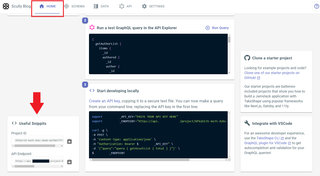
To connect to your project's GraphQL API, you'll need both an endpoint and an API Key.
You can find your project’s API Endpoint in the admin UI by visiting the website and going to your project dashboard. Select the Home tab and scroll down. On the bottom left you'll see a section marked "Useful snippets". Copy your API Endpoint from there.
To generate an API Key for your project, check out our docs that describe that process.
If you already have a project, an API Endpoint and an API Key with read or higher permissions, then you're ready to get started.
Creating your Astro project
Now we'll create our Astro project. For this guide, we're going to create a simple product listing page by pulling ecommerce data from a project and rendering each product out as individual components. We'll first render them as React components, then as Astro components, to demonstrate both processes.
Initial setup
Astro recommends using NPM to initialize your projects. Create a directory where you'd like your project to be, then navigate to that directory in your terminal and use the following command:
npm init astro --your-project-name-here
You should see something like this in your terminal:

You'll be asked which app template you'd like to use, and you'll be given multiple options. Choose the first one (Starter Kit) by hitting enter.
Next you'll need to choose your favorite framework. For this project, we'll use React. Navigate to it with the tab or arrow keys, then press enter.

The last step is to enter npm install into your terminal, and wait for the installation process to complete.
Now your project's initialized. Let's start building it out.
Creating your index component
First we'll create our index page, which is itself an Astro component. Astro's components include scripting, templating and styling all into one file, much like Vue and Svelte, which we'll take advantage of to keep things simple.
Navigate to the src/pages directory and open index.astro in your favorite IDE or text editor. Delete everything inside so that the file is empty.
Let's start by creating a simple HTML template. Copy the code below:
<html lang="en">
  <head>
    <style></style>
  </head>
  <body>
    <main>
      <h1>Products:</h1>
      <div class="demo-container">
        <div class="product-container">
          <h2>React Products</h2>
        </div>
        <div class="product-container">
          <h2>Astro Products</h2>
        </div>
      </div>
    </main>
  </body>
</html>
With the above template, we're rendering a page that says "Products", "React Products" and "Astro products" on three separate lines. You can enter npm run dev from your terminal to test it out. You should see this:

Of course there are more elements in our template, but those are containers for the info we'll begin plugging in now.
We want to render our products both in React components and Astro components to demonstrate both processes, so let's start with creating the Astro components.
Creating our Astro component
Navigate to the src/components directory of your project, and create a new file called AstroProduct.astro.
We're going to create an Astro component using a combination of HTML and Markdown.
First we'll open the file and enter 6 dotted lines: 3 on one line, an empty line after it, and then 3 dots on the next, as shown below:
---

---
This is known as a code fence, and it's what Astro uses to section off the JavaScript that will run at build time before the component is rendered. Learn more in the Astro docs.
We're going to put our JavaScript between those dotted lines, so we can import Astro's markdown plugin into our component. We'll also define a product variable, which will represent the product that will be passed to the component as a property.
---
import { Markdown } from 'astro/components';
const { product } = Astro.props;
---
Now, we'll define our template using a combination of HTML and markdown, which we'll set as children inside a Markdown component:
<section>
  <img style="width:100%" src={product.image.sourceUrl} />
  <Markdown>
    **{product.name}**: ${product.price}
    ### {product.description}
  </Markdown>
</section>
In the above code, we're creating a section that has an image and some markdown. Much like React, Astro components allow you to inject variables into your templates by wrapping them in curly braces { }. Our template will take an image, below which will be the product's name and price, and below that will be its description.
We'll pass the product object to the component when we render the component on the index page, but for now let's move on. This is what the full component should look like:
---
import { Markdown } from 'astro/components';
const { product } = Astro.props;
---

<section>
    <img style="width:100%" src={product.image.sourceUrl} />
    <Markdown>
        **{product.name}**: ${product.price}
        ### {product.description}
    </Markdown>
</section>
Creating our React component
To use React components in Astro, you have to go through a slightly more complicated process. The Starter Kit Astro project does not come with a React renderer installed by default, so you'll have to set one up yourself.
Enter the following commands into your terminal:
npm i --save-dev @astrojs/renderer-react react react-dom
This installs all necessary React libraries, as well as Astro's renderer.
Now just navigate to astro.config.mjs in the root directory of your project, and you should see a file like this:
export default {
  // projectRoot: '.',     // Where to resolve all URLs relative to. Useful if you have a monorepo project.
  // pages: './src/pages', // Path to Astro components, pages, and data
  // dist: './dist',       // When running `astro build`, path to final static output
  // public: './public',   // A folder of static files Astro will copy to the root. Useful for favicons, images, and other files that don’t need processing.
  renderers: [],
  buildOptions: {
    // site: 'http://example.com',           // Your public domain, e.g.: https://my-site.dev/. Used to generate sitemaps and canonical URLs.
    sitemap: true // Generate sitemap (set to "false" to disable)
  },
  devOptions: {
    // hostname: 'localhost',  // The hostname to run the dev server on.
    // port: 3000,             // The port to run the dev server on.
    // tailwindConfig: '',     // Path to tailwind.config.js if used, e.g. './tailwind.config.js'
  }
};
In the array being assigned to the renderers property, add '@astrojs/renderer-react'
Here's what the final file should look like:
export default {
  renderers: ['@astrojs/renderer-react'],
  buildOptions: {
    sitemap: true
  },
  devOptions: {}
};
Now we're finally ready to create our React component.
Navigate to src/components and create a file called ReactProduct.js.
This component will be the same as our AstroProduct.astro component was, except we'll add some styling details that we don't get by default because we're not using Markdown:
export default function ReactProduct({ product }) {
  return (
    <section>
      <img src={product.image.sourceUrl} />
      <span>
        <b>{product.name}</b>: ${product.price}
      </span>
      <h3>{product.description}</h3>
    </section>
  );
}
As you can see, we're just recreating what our previous component looked like. Below is what the whole file should look like, with the styles added:
export default function ReactProduct({ product }) {
  return (
    <section
      style={{
        display: 'flex',
        flexDirection: 'column',
        borderBottom: '1px solid black'
      }}
    >
      <img style={{ width: '100%' }} src={product.image.sourceUrl} />
      <span style={{ marginTop: '1rem' }}>
        <b>{product.name}</b>: ${product.price}
      </span>
      <h3>{product.description}</h3>
    </section>
  );
}
And now we're ready to render these components in our index page.
Fetching Data
We're going to pull data from our project, then render our React and Astro components for each product we retrieve. Let's set up the code to do that now.
Navigate to src/pages/index.astro. At the top of the page, set up a code fence like before and import both your components:
---
import ReactProduct from '../components/ReactProduct.jsx';
import AstroProduct from '../components/AstroProduct.astro';
---
Now we'll do a fetch request to our project's GraphQL API endpoint. We must use the POST method, and to authenticate we must pass our API key as a Bearer Token. If you don't have your project's endpoint or API key yet, check out our section on that above.
Because we're using GraphQL, we need to specify which data we want returned in the response. As we defined in the components above, we'll need the name, price, description and image of each product. On the image poperty, we'll need the sourceUrl.
Here's what the code should look like:
---
import ReactProduct from '../components/ReactProduct.jsx';
import AstroProduct from '../components/AstroProduct.astro';

    let products = null;
    try{
        const result = await fetch(
            process.env.SNOWPACK_PUBLIC_GRAPHQL_ENDPOINT,
            {
                headers: {
                    authorization: `Bearer ${process.env.SNOWPACK_PUBLIC_GRAPHQL_KEY}`
                },
                method: 'POST',
                body: JSON.stringify({
                    query: `query{
                        getProductList{
                            items{
                                name
                                price
                                image{
                                    sourceUrl
                                }
                                description
                            }
                        }
                    }`
                })
            }
        );

        //error handling
        if(result.ok){
            const resultJSON = await result.json();
            products = resultJSON.data.getProductList.items;
        } else {
            throw new Error(`${result.status}: ${result.statusText}`);
        }
    } catch(error) {
        console.log(error);
    }
---
You may have noticed in the above code that we're using process.env.SNOWPACK_ to get our endpoint and API key. That's because we're using environment variables to pull in this sensitive data, and Astro manages environment variables with snowpack.
Using a .env file, which you can pull data from locally and never upload to your repo, protects you from this issue.
Let's configure snowpack to use environment variables:
Using Environment variables with Astro
Astro uses Snowpack under the hood to handle much of its configuration, so to enable environment variables requires setting up a snowpack config file. To keep things simple, we're also going to use an NPM package called @snowpack/plugin-dotenv, which will allow us to use a standard .env file for our environment variables.
Install the dotenv snowpack plugin by entering the below command into your terminal:
npm i @snowpack/plugin-dotenv
Now navigate to the root of your project and create a file called snowpack.config.mjs. Copy the below code and paste it into this file, then save it.
export default {
  plugins: ['@snowpack/plugin-dotenv']
};
Now you can use environment variables. You'll just need to prefix all your environment variables with SNOWPACK_PUBLIC_ to use them.
Let's get back to our index component.
Injecting data into our components
In the previous sections, we:
- Created an index component
- Created a React product component
- Created an Astro product component
- Wrote a fetch request to our project's endpoint
Now we have the data—let's use it.
Now let's add code that will use the Array map() functionality built into JavaScript arrays to cycle through all our products and render them as React and Astro components:
html lang="en">
<head>
</head>
<body>
    <main>
        <h1>Products:</h1>
        <div class="demo-container">
            <div class="product-container">
                <h2>React Products</h2>
                {
                products.map(product=><ReactProduct product={product}/>)
                }
            </div>
            <div class="product-container">
                <h2>Astro Products</h2>
                {
                products.reverse().map(product=><AstroProduct product={product}/>)
                }
            </div>
        </div>
    </main>
</body>
</html>
You'll notice that with the Astro components, we're rendering the array in reverse. This is just so the lists look different from each other. We're going to render them side-by-side, which will take a small amount of styling. We'll add the below HTML to our template:
<head>
    <style>
        .demo-container{
            display: flex;
            column-gap: 2rem;
            max-width: 100%;
            overflow: hidden;
        }
    </style>
</head>
And the final component should look like this:
---
import ReactProduct from '../components/ReactProduct.jsx';
import AstroProduct from '../components/AstroProduct.astro';

    let products = null;
    try{
        const result = await fetch(
                process.env.SNOWPACK_PUBLIC_GRAPHQL_ENDPOINT,
                {
                    headers: {
                        authorization: `Bearer ${process.env.SNOWPACK_PUBLIC_GRAPHQL_KEY}`
                    },
                    method: 'POST',
                    body: JSON.stringify({
                        query: `query{
                            getProductList{
                                items{
                                    name
                                    price
                                    image{
                                        sourceUrl
                                    }
                                    description
                                }
                            }
                        }`
                    })
                }
            );

        if(result.ok){
            const resultJSON = await result.json();
            products = resultJSON.data.getProductList.items;
        } else {
            throw new Error(`${result.status}: ${result.statusText}`);
        }
    } catch(error) {
        console.log(error);
    }
---

<html lang="en">
<head>
    <style>
        .demo-container{
            display: flex;
            column-gap: 2rem;
            max-width: 100%;
            overflow: hidden;
        }
    </style>
</head>
<body>
    <main>
        <h1>Products:</h1>
        <div class="demo-container">
            <div class="product-container">
                <h2>React Products</h2>
                {
                    products.map(product=><ReactProduct product={product}/>)
                }
            </div>
            <div class="product-container">
                <h2>Astro Products</h2>
                {
                    products.reverse().map(product=><AstroProduct product={product}/>)
                }
            </div>
        </div>
    </main>
</body>
</html>
Now we can build our project with npm run build, or run the dev server with npm run dev.
If you're not using npm, just use astro build or astro dev. There is no command for serving Astro projects locally from build folders, but you can serve your build through a hosting provider like netlify.
Here's what the final page should look like:

Still need help? Get in touch with us.