Shape Caching/Indexing
Whether you want to avoid rate limits, increase data fetching speeds or protect your applications from service outages, API Indexing is a great solution.
This guide will walk you through configuring a project to index data from your eCommerce APIs on a schedule, or when webhooks are triggered. Advanced users should read our Spec Reference to get started much faster.
Follow along with this guide by checking out our starter project repo. Our starters let you instantly deploy a pre-configured project.
If you're new, check out our guide for creating projects. We also have a guide on connecting services, and a list of guides for many major services, like Shopify or BigCommerce.
Using the UI
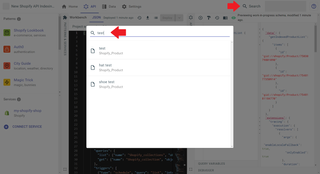
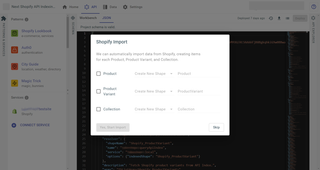
After connecting your Shopify service, you'll immediately see a popup modal where you can switch on API Indexing for any of your Shopify data. There's a filter field above the list of indexable data, where you can type out the name of the shape you'd like to index. Type in product or collection to see one of the examples we've set up in our Shopify API Indexing starter pattern. Once you've activated the data you'd like to index, select "Update Schema."

The Shopify Admin API works via creation and configuration of a custom Shopify app, which must be installed in your store to use the Shopify service in your project. Test out what queries you can call by running them in the API Explorer.
To manually open the API Indexing menu, select the three dots beside the service you want to index in the Services list on the left side. In the menu that appears, select Configure Indexing.

You can search for your indexed data with the search field in the navbar at the top-right of the web client. Enter the name of any product, collection or other data you've indexed, and it'll show up in the results.
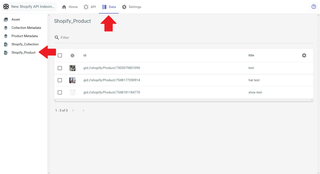
Alternatively, you can navigate to the Data tab and see your indexed data of any shape by selecting it in the sidebar on the left.
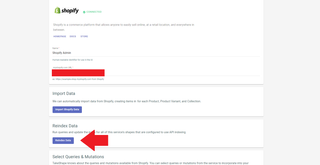
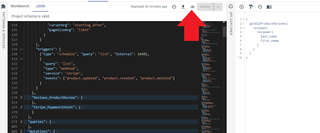
If you can't see your indexed data, try triggering reindexing by navigating to the service page of the API you're indexing data from. For example, below is a screenshot of the Reindexing button on the Shopify service page.
To fetch your indexed data from a frontend application, you'll need to create a query that fetches it from ShapeDB.
Configuring your Shape cache/loaders
Indexing for a shape is enabled when you define both the cache and loaders properties on the given shape.
For example:
{
  "shapes": {
    "Stripe_Customer": {
      "name": "Stripe_Customer",
      "id": "Stripe_Customer",
      "title": "Stripe_Customer",
      "schema": {
        "extends": [{ "@ref": "stripe:Customer" }]
      },
      "cache": {
        "enabled": true,
        "triggers": [
          {
            "type": "schedule",
            "loader": "list",
            "interval": 1440
          }
        ]
      },
      "loaders": {
        "list": {
          "query": "stripe:Query.listCustomers"
        }
      }
    }
  }
}
The loaders object contains configuration information for the get and list loaders that will be used to fetch data for the cache. The cache.triggers array contains configuration information for how these queries will be triggered.
Now let's explore the process of configuring an indexed shape.
Using service shapes
If you don't have shapes for your service's data defined in your schema, navigate to the API tab in your project's dashboard. There, you can select the service you wish to import shape data for. You'll be taken to the service page, where you can select the Import Data button to begin importing your data.

Finally, a popup modal will be shown, which will allow you to choose which data you'd like to import from your project. You can also indicate whether or not you'd like to create new shapes in your schema to represent that data. If you create a new shape, you can define the name of that shape here as well.
Using service queries
In the below example, you'll notice the use of Shopify_products for the name of the list query. When the indexer runs for this shape, it will execute the Shopify_products query to fetch a list of Shopify_Product.
{
  "shapes": {
    "Shopify_Product": {
      "name": "Shopify_Product",
      "id": "Shopify_Product",
      "title": "Shopify_Product",
      "schema": {
        "extends": [{ "@ref": "shopify:Product" }]
      },
      "loaders": {
        "list": {
          "query": "shopify:Query.product"
        }
      },
      "cache": {
        "enabled": true,
        "triggers": [
          {
            "type": "schedule",
            "loader": "list",
            "interval": 1440
          }
        ]
      }
    }
  }
}
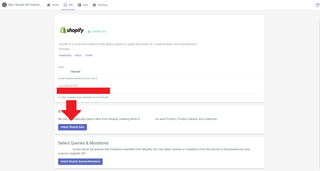
You can manually create the list query for your service, or automatically generate it.
To do so, visit the service page as demonstrated above, where you'll find the "Select Queries/Mutations" button. Selecting this button will open a popup modal where you can choose to import generated queries for your service into your schema.

Configuring loaders in your indexed shape
There are two types of loaders: list and get. You configure the list loader to index a paginated list of the corresponding shape in your service, and configure get to index a single instance of that shape. You can read up on the appropriate properties for configuring these queries in the schema spec reference.
Here are some examples of valid list and get configurations:
Shopify:
{
  "shapes": {
    "Shopify_Collection": {
      "id": "Shopify_Collection",
      "name": "Shopify_Collection",
      "title": "Shopify_Collection",
      "cache": {
        "enabled": true,
        "fragment": {
          "maxDepth": 2,
          "ignoreFields": ["privateMetafields", "ruleSet"]
        },
        "triggers": [{ "type": "schedule", "loader": "list", "interval": 1440 }]
      },
      "loaders": {
        "list": {
          "query": "Shopify_collections"
        },
        "get": {
          "query": "Shopify_collection"
        }
      }
    }
  }
}
Note the ignoreFields in the above example. The indexer will run your queries with every valid field possible in the selectionSet. To exclude a field from the selectionSet, create an ignoreFields array in your query configuration.
Configuring pagination is not necessary for Shopify because Shopify's API implements Relay's cursor-based connections specification.
Data returned from list queries will be automatically paginated by Relay-style pagination. If your service's documentation doesn't explicitly state if it uses Relay-style pagination, you can usually tell by how list queries are structured.
List queries for APIs that use Relay-style pagination require the use of edges and nodes to access the data in each item of the list. For example, below is a query that lists all Shopify products from the Admin API:
{
  Shopify_products(first: 10) {
    nodes {
      id
      title
    }
  }
}
Relay is Facebook's GraphQL client, and you can read more about this particular style of cursor-based pagination in the GraphQL docs.
Stripe:
{
  "shapes": {
    "Stripe_Customer": {
      "name": "Stripe_Customer",
      "id": "Stripe_Customer",
      "title": "Stripe_Customer",
      "schema": {
        "extends": [
          {
            "@ref": "stripe:Customer"
          }
        ]
      },
      "loaders": {
        "list": {
          "query": "stripe:Query.listCustomers"
        }
      },
      "cache": {
        "enabled": true,
        "triggers": [
          {
            "type": "schedule",
            "loader": "list",
            "interval": 1440
          },
          {
            "type": "webhook",
            "loader": "list",
            "service": "stripe",
            "events": ["customer.created", "customer.updated", "customer.deleted"]
          }
        ]
      }
    }
  }
}
The indexer paginates Stripe data by default. There's no need to configure pagination.
When setting up your Stripe service you can also configure webhooks for more responsive indexing. The steps involved are:
- Add your Stripe service.
- Set up an indexed shape as in the above example.
- In your Stripe dashboard go to Developers > Webhooks and create a new webhook using an endpoint that follows this scheme:
api.takeshape.io/project/YOUR_PROJECT_ID/webhooks/indexing/YOUR_STRIPE_SERVICE_ID - Add a trigger to the
triggersarray above that looks like this. Notice theeventswhich should match the events you which to intercept to refresh your index.{"type": "webhook", "loder": "list", "service": "{YOUR_STRIPE_SERVICE_ID}", "events": ["customer.created", "customer.updated", "customer.deleted"]} - Copy the webhook secret from your new Stripe webhook. Paste it into the Stripe service config in the Webhook Secret field.
Configuring triggers in your indexed shape
There are two valid types of triggers: webhook and schedule. Use your triggers to configure when the API indexer will cache data fetched from your defined queries. Let's look at two examples of trigger configs:
BigCommerce:
{
  "shapes": {
    "BigCommerce_Product": {
      "name": "BigCommerce_Product",
      "id": "BigCommerce_Product",
      "title": "BigCommerce_Product",
      "schema": {
        "extends": [{ "@ref": "bigcommerce:Product" }]
      },
      "loaders": {
        "get": {
          "query": "bigcommerce:Query.product"
        },
        "list": {
          "query": "bigcommerce:Query.products"
        }
      },
      "cache": {
        "enabled": true,
        "triggers": [
          {
            "type": "webhook",
            "loader": "get",
            "service": "bigcommerce",
            "events": ["store/product/created"]
          },
          {
            "type": "schedule",
            "loader": "list",
            "service": "bigcommerce",
            "interval": 1440
          }
        ]
      }
    }
  }
}
Webhook triggers:
Note the use of the webhook trigger type in the example above. Shapes with queries triggered by webhooks will only begin indexing when the events you specify happen. You can find a list of webhook events for your service in the service's documentation. For example, BigCommerce lists all of its events.
Schedule triggers:
There's also a schedule trigger defined in the above example, and you'll notice that the interval is set to 1440. The interval property takes an integer number of minutes to wait between attempts at indexing your data. We recommend setting your interval to no less than 1440 in most instances, as that will cause your indexer to run every 24 hours.
Generic REST
{
  "shapes": {
    "Recharge_Product": {
      "name": "Recharge_Product",
      "id": "Recharge_Product",
      "title": "Recharge_Product",
      "schema": {
        "extends": [{ "@ref": "recharge:Product" }]
      },
      "cache": {
        "fragment": {
          "maxDepth": 2
        },
        "triggers": [{ "type": "schedule", "loader": "list", "interval": 1440 }]
      },
      "loaders": {
        "list": {
          "query": "listRechargeProducts",
          "pagination": {
            "type": "cursor",
            "cursorPath": "products[(@.length-1)].id",
            "itemsPath": "products",
            "hasMorePath": "next_cursor",
            "cursorArg": "next_cursor",
            "pageSizeArg": "limit"
          }
        }
      }
    }
  }
}
There are two important factors when indexing data from a generic rest service: Configuring pagination and creating shapes for the data.
The above example uses Recharge, a service that enables subscriptions in Shopify stores. You can find pagination specifications for your REST service in its docs, like this guide to Recharge pagination.
Some APIs have multiple versions, and multiple corresponding versions of their documentation. For example, Recharge's 2021-01 API uses page-based pagination, but their 2021-11 uses cursor-based pagination.
You can learn which properties are valid for configuring your pagination object in the schema spec reference.
The data returned from the queries specified in your indexed shape must match a shape defined in your schema. Read our guide on working with shapes to learn how to create a shape for your generic rest service's data.
Creating queries for your API index
Finally, to use the indexed data in, you must create a query in your schema to fetch your data from the index. You can follow our guide on creating queries and mutations to do so. Below is an example of a query that fetches indexed Shopify products:
{
  "queries": {
    "getIndexedProductList": {
      "shape": "PaginatedList<Shopify_Product>",
      "resolver": {
        "shapeName": "Shopify_Product",
        "name": "takeshape:queryApiIndex",
        "service": "takeshape",
        "options": { "indexedShape": "Shopify_Product" }
      },
      "description": "Fetch Shopify products from the API Index.",
      "args": "TSListArgs<Shopify_Product>"
    }
  }
}
Troubleshooting your API index
API Indexing will trigger whenever you deploy a schema with changes to the triggers of one of your indexed shapes, or import data from a service into your project. When you're on your project dashboard in the admin UI, you'll see a small popup modal indicating the beginning and end of indexing.


If indexing any of your shapes fails, there are a few areas you can examine immediately for quick potential fixes.
First steps
If you're having issues with your API Indexing, first check that you've configured your cache/loaders correctly. Confirm that your configuration matches the valid properties for the service you're using. If you're indexing a list query, confirm that your pagination is accurately configured to query your service. Below is a list of links to the pagination documentation of some of the most common eCommerce services:
See the examples above for more help configuring your queries.
Check the API Indexing log
In your project's dashboard in the admin UI, open up the API Indexing Log by selecting its button. Navigate to the API Tab, then select the button beside the Export Schema button—its icon looks like a bulleted list.
You'll see a filterable list of API Indexing events. Select the Inspect Payload button beside failed items to see what query the indexer ran and what result was returned. The button looks like a small i icon.

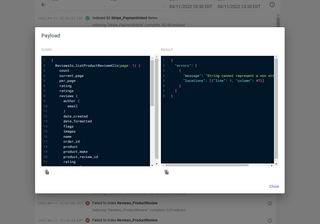
If there are issues with the query the indexer is running, confirm that the query you specified for fetching your indexed shape returns the data you're expecting.
Check your ignoreFields
The ignoreFields array in your query object specifies which fields to ignore when the indexer queries your service. The indexer will add every possible field to the selectionSet when querying your service, and some services have query fields only available to users at higher subscription tiers. If your account with the service is not allowed to query those fields, you must include them in your ignoreFields array to successfully query the service. Here is an example of an ignoreFields array that instructs the indexer to omit fields:
{
  "ignoreFields": ["fieldExample1", "fieldExample2", "fieldExample3"]
}
Check your maxDepth
If your maxDepth is too high, this may cause the query sent to the service to be too complex, which could result in the API Indexer receiving an error response. For example, the proper objectDepthLimit for Shopify is 1. Experiment to see what works for your service.
Check your triggers
Webhook triggers can be troublesome if your service's documentation is unclear. Be sure that the event names you provide to the events array in your triggers object are valid. Ensure also that you are referencing documentation relevant to the version of the API you are using, as there can be major differences between API versions for eCommerce service providers.
Here is an example of a webhook trigger for a shopify service:
{
  "type": "webhook",
  "loader": "get",
  "service": "my-shopify-shop",
  "events": ["products/create", "products/update", "products/delete"]
}
Below is a list of links to the webhook events for some of the most popular eCommerce services:
Wildcards
We don't currently support wildcards (the * symbol) in webhook event handling, so a trigger with the follow events array will not index:
"events": ["store/carts/*"]
Nested Indexes
Elastic Search nested field indexes are supported on a limited opt-in basis on indexed remote shapes. This allows the creation of facet-like searches which would otherwise not work.
Here's an example using the Rick and Morty API to extend the character shape and provide a nested search index on the character's episodes:
{
  "Rick_Character": {
    "id": "Rick_Character",
    "name": "Rick_Character",
    "title": "Rick Character",
    "schema": {
      "extends": [
        { "@ref": "rick:Character" },
        {
          "type": "object",
          "properties": {
            "episode": {
              "type": "array",
              "items": { "@ref": "rick:Episode" },
              "@mapping": "rick:Character.episode",
              "@indexed": { "nested": true }
            }
          }
        }
      ]
    },
    "cache": {
      "enabled": true
    },
    "loaders": {
      "list": {
        "query": "rick:Query.characters"
      }
    }
  }
}
You can now perform a query like this, where both name AND id will need to match on the same record to return a hit.
Normally this would be treated as an OR query.
{
	search(where:{episode:{name: {eq:"Lawnmower Dog"}, id: {eq: "2"}}}) {
    total
		results {
      ...on Rick_Character {
        name
        id
      }
    }
  }
}
To ensure great performance, your project schema will be limited to 50 nested field indexes.
Still need help? Get in touch with us.