Shapes
Shapes are objects in your project schema that represent data your schema will fetch, mutate and store in your project.
At a low level, a shape is a JSON object that lists what properties certain data will have—it specifies the shape of the data. This list of properties is used to generate the GraphQL API and a admin UI experience for data editing. You can think of it like a type in a GraphQL API.
For example, a Product shape should list the properties a product would have, like id, title, and price. Those properties should be typed appropriately, like string for id and title, and integer or number for price. Individual product objects will have values for those properties, and the GraphQL API exposes type information thanks to the Product shape.
At a higher level, a shape is a representation of data you want to manipulate. When you create shapes in the admin UI editor, the queries and mutations to fetch and update instances of that shape are automatically generated. By creating shapes in your project's JSON schema, you can join content from various services into a single data structure stored in ShapeDB. You can then expose that data to your frontend applications via your project's GraphQL API.
This guide will teach you how to use shapes. For more information, check out the section on shapes in our schema spec reference.
Creating Shapes
Shape Editor
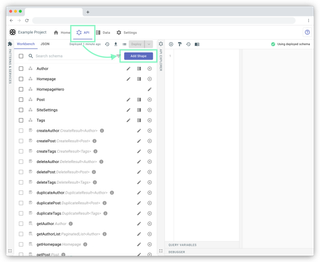
In the admin UI, navigate to the API tab. Select the Workbench tab in the Workbench panel at the center of the page. Select the Add Shape button to begin creating a shape.
As you make changes to your shape, the scratch schema will be automatically updated in the background. This way, you can immediately preview any changes in your GraphQL API.
Once you're happy with your changes, you can save them using the purple "Deploy" button in the schema toolbar.
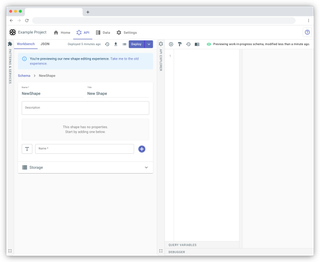
Metadata
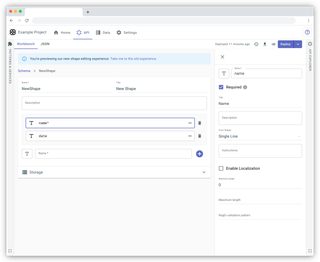
In the shape editor, you can specify the title and name of your shape:
- The
namemust contain no spaces, dashes, underscores or special characters. - The
titlecan be more human-readable, with spaces, underscores and dashes, but with no special characters.
Properties
You can add, edit, and remove properties on the shape.
Add a property from the form at the bottom of the list. Pick the property's type and give it a name, then use the "plus" button to add it.
Selecting a property will open its editor panel, with the ability to configure property metadata like name, title, and description, as well as configure the form widget for editing the property in ShapeDB.
While a property is selected, you can select adjacent properties using the up and down arrow keys. Properties can be reordered using drag-and-drop or Shift + Up/Down Arrow.
To delete a property, use the trash can button next to it in the list; or, use the Delete key when the property is selected.
You can learn more about property editing in our guide to data modeling.
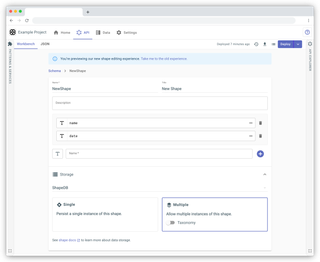
Storage
Shapes on their own are useful for representing data stored in external services, but sometimes you want to store data that isn't available on a given service. There is a built-in database called ShapeDB which can store data using your shape as a model.
The three storage options are:
-
None — Store nothing in ShapeDB. Best for defining shapes you'll reuse inside other shapes, like "SEO Metadata," or shapes for data that will be stored in an external service.
-
Single — Store one instance of this shape in ShapeDB. This makes sense if your shape represents data there won't be multiple instances of, like a
HomepageorSettings. -
A
getShapequery, as well asupdateShape,deleteShape, andcreateShapemutations are added to your project schema. For example, if you create aHomepageshape, your schema will havegetHomepage,createHomepage,deleteHomepageandupdateHomepagein it. You can then call these queries from your frontend applications or test them in the API Explorer. -
Multiple — Store multiple instances of this shape. Best for data that you expect multiple instances of, like
ProfileorProductshapes. -
In addition to the same queries and mutations added to your schema for Single storage shapes, a
getShapeListquery will be added. For example, aProductshape with Multiple storage will add agetProductListquery to your schema. -
You can also switch on the Taxonomy option to use this shape to categorize other shapes. For example, a
Product Categoriesshape could be used to filter a list ofProducts. Learn more in the Taxonomy section of our data modeling docs.
Once your shape is configured, select the Deploy button at the top of the page, and your changes will be saved to your project schema.
Edit and query shape data
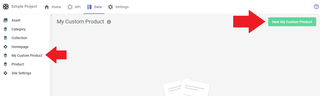
Navigate to the Data tab to see your new shape, then select it in the list on the left. Select the New Shape button at the top-right of the page to create an instance of that shape. For example, if your product's title is "My Custom Product," the button's text will be New My Custom Product.
You can then fill out the fields you specified in the shape editor to create an instance of the shape. Be sure to select Enabled at the right side of the page before saving your shape. Otherwise it won't be accessible from your API.
Now navigate to the API tab and select the Workbench tab. You can scroll through your list of shapes and queries here, or you can search for it in the search bar above the list. Select the Preview in API Explorer button to the right of your shape, and a query to fetch your data will be generated in the API Explorer. Select the Run button above the API Explorer, and your data will be fetched.
You can run this same query in your frontend applications.
To learn how to do more complex actions with your shapes, like attach data from remote APIs to them, read the next section of this guide.
Schema JSON
You can create shapes by editing your project's JSON schema. View your schema by navigating to the API tab, then selecting the JSON tab in the Workbench panel.
Editing the schema allows you to configure shapes that interact with remote API services. For example:
- You want to create a
Productshape that combines data from Shopify and Recharge. That shape would allow you to fetch products with one-time-purchase information from Shopify and subscription details from Recharge in a single query from your frontend web app. - You want to create a
Profileshape that stores Auth0 credentials when thecreateProfilemutation is called. This would allow you to serve user-scoped profile data to your application without having to build out your own user authentication architecture.
Configuring shapes for advanced use-cases like these unlocks the ability to be a backend for your composable e-commerce applications.
First, learn how to define a shape in your schema in the section below.
You can see an example of a Profile shape that uses Auth0 in our E-commerce Kitchen Sink starter. Deploy the pattern to test it out. Clone the repo to run the project on your local machine.
Defining a basic Shape
All shapes must have the same required properties:
-
"id"— A unique identifier. This can be any string. When you create a shape in the shape editor, a randomized string is generated for this value. When you manually create a shape in your schema, you can set this value to whatever unique string you'd like. -
"name"— A unique name string that can't contain spaces, dashes, underscores or special characters. The"name"property must have the same value as the shape's object key. -
"title"— A unique title that can be a more human-readable than the"name". You can use spaces, underscores and dashes, but not special characters. -
"schema"— The object where the shape's properties are specified. Learn more below.
Optional properties include:
-
"workflow"— Takes the name of the workflow this shape should be scoped to as a string. Learn more in our workflow guide. -
"model"— The data model used to store instances of this shape. Valid properties include"multiple","single", and"taxonomy". Learn more in our data modeling guide. -
"description"— A description of the shape. This description appears in the Docs Panel and can be any string.
Configuring a Shape schema
A shape's schema is its most important property. The schema is where you define which fields exist on a shape, as well as how to fetch the data for those fields.
The "schema" object itself has two required properties:
-
"type"— The data type of the"schema"property. This should almost always be"object". -
"properties"— The fields the shape will have.
There's also one optional property:
"required"— An optional array of names of properties that must be filled when a new instance of the shape is created. For example,"required": ["id", "title"]
The most important property of the "schema" is the "properties" object, where you can specify all fields a shape has.
For example, a Product shape might have two fields: "title" and "price". Its schema would look like this:
"schema": {
    "type": "object",
    "properties": {
        "title": {"type": "string"},
        "price": {"type": "number"}
    }
}
Each attribute in the "properties" object only requires an object key and a "type" field within its object. There are also many optional properties that are useful when you want to store instances of a shape.
-
"@mapping"— This value is typically generated when you create a shape in the shape editor. It defines where to find data for instances of this shape. Changing it will cause you to lose data. -
"minLength"— The minimum character length for the property. For example, if the property is"handle"and the shape isProduct, you may want thecreateProductmutation to fail if thehandlebeing assigned to the new product is an empty string. -
"minimum"— The minimum value possible for anintergertype property. -
"description"— A description that will appear in the Docs Panel of the API explorer in your project, as well as on the Create Shape page in the Data tab when you create an instance of the shape. -
"title"— A title for the property. For example, the product itself might be"sellingPlanId", but you might want to title it"Selling Plan ID"so that it's more human-readable when you encounter it in the shape editor.
Here's an example of a shape generated by the editor:
"CustomProduct": {
    "id": "7zR3azGWE",
    "name": "CustomProduct",
    "title": "My Custom Product",
    "description": "A custom product",
    "workflow": "default",
    "model": {"type": "taxonomy"},
    "schema": {
        "type": "object",
        "properties": {
            "title": {
                "type": "string",
                "minLength": 1,
                "description": "A title for the product",
                "title": "Title",
                "@mapping": "shapedb:CustomProduct.34LPOX222"
            },
            "price": {
                "@l10n": false,
                "minimum": 0,
                "type": "integer",
                "description": "",
                "title": "Price",
                "@mapping": "shapedb:CustomProduct.xaoc1ABSI"
            }
        },
        "required": ["title", "price"]
    }
}
For more information on schema properties, check out the shapes section of our spec reference.
Service Schema Shapes
When you connect one a service, such as BigCommerce or Stripe, or a GraphQL service, like Shopify Storefront, shapes are generated from the types introspected from the service's API. These shapes do not appear in your JSON schema, but they are saved in a hidden file called the Service Schema.
Your Service Schema is a large file that contains all the shapes and queries that are generated to allow you to query data from your connected services. Although this file is hidden, you can reference queries, mutations and shapes defined in your service's documentation as if those things existed within your schema.
For example, the Product type in BigCommerce becomes a BigCommerce_Product shape.
You can see these generated shapes in the Docs Panel by selecting the docs button above your API Explorer in the API tab. Search for the service you're interested in using. You'll see a list of types with the service's namespace prepended to the front of them. These types are also shapes available to your schema.
For example, if you connect the Shopify Admin API using our dedicated Shopify Admin provider, you'll find a list of available shapes in the Docs Panel. These Shapes are Shopify's types with Shopify_ prepended to the front, like Shopify_Product and Shopify_Collection. In this case, Shopify is the namespace for these types.
Alternatively, you can reference these shapes by scoping them with the service's id. You can find a service's ID in your JSON schema by navigating to the "services" object at the root-level of the schema. You can change the id there, or you can edit your service in the admin UI and change the Slug input field's value to whatever you'd like the id to be.
For example, if your Shopify Admin API's service id is my-shopify-shop, then you can scope shapes from the Admin API with "my-shopify-shop:X", where X is whatever shape you'd like, like Product or Customer.
You can use these shapes as values for the "shape" field when you configure queries and mutations, which you can read about in our queries and mutations guide.
You can also add custom properties to these shapes, or use these shapes as properties on your own custom shapes. Read the next section in this guide to learn more.
Referencing Shapes
You can reference a shape that already exists in your schema or is available from a connected service by using "@ref".
Let's say you want to create a shape that serves as a list of another shape, like an OrderList shape that contains a list of Order instances.
Your OrderList will have an array property called orders, and you'll have to define the properties that the items within orders will have. This is required for type information to be available when you fetch an OrderList. In this case, since your orders property's items are Order instances, you have to explicitly define each property of the Order shape.
For example:
"OrderList": {
    "id": "OrderList",
    "name": "OrderList",
    "title": "OrderList",
    "schema": {
        "type": "object",
        "properties": {
          "orders": {
            "type": "array",
            "items": {
                "type":"object",
                "properties": {
                    "prop1": {"type":"string"},
                    "prop2": {"type":"number"},
                    "prop3": {"type":"boolean"},
                    "prop4": {"type":"integer"},
                    "prop5": {"type":"string"},
                    "prop6": {"type":"boolean"},
                    ... etc
                }
            }
          }
        }
    }
}
But you can skip having to paste all of the properties of an Order shape by using "@ref". Instead, your OrderList will look like this:
"OrderList": {
    "id": "OrderList",
    "name": "OrderList",
    "title": "OrderList",
    "schema": {
        "type": "object",
        "properties": {
          "orders":{
            "type": "array",
            "items": {"@ref": "local:Order"}
          }
        }
    }
}
In the above example you must scope Order with local: so the Order shape can be found in your JSON schema. In general, when using "@ref", you must scope local shapes this way. "local:X"
This same logic can be used to attach any shape to any shape.
For example, a schema with ProductList, FriendList, and OrderList shapes defined in it could have a Profile shape that references a user's reviews, friends and orders as shown below:
"Profile": {
    "id": "Profile",
    "name": "Profile",
    "title": "Profile",
    "schema": {
        "type": "object",
        "properties": {
          "userId": {"type": "string"},
          "reviews": {"@ref": "local:ReviewList"},
          "friends": {"@ref": "local:FriendList"},
          "orders": {"@ref": "local:OrderList"},
        }
    }
}
Each of those list shapes would of course contain items that reference shapes for their individual instances, like Friend, Review and Order.
"ReviewList": {
    "id": "ReviewList",
    "name": "ReviewList",
    "title": "ReviewList",
    "schema": {
        "type":"object",
        "properties": {
            "reviews": {
                "type":"array",
                "items": {"@ref": "local:Review"}
            },
            "total": {"type":"integer"}
        }
    }
}
And the shapes for the individual instances would contain all the important properties and type information.
"Review": {
    "id": "Review",
    "name": "Review",
    "title": "Review",
    "schema": {
        "type":"object",
        "properties": {
            "id": {"type":"string"},
            "title": {"type":"string"},
            "reviewText": {"type":"string"},
            "rating": {"type":"integer"},
        }
    }
}
You can also use shapes from a service as properties on your custom shapes. After you connect a service to your project, its types become shapes available to your schema. You can reference these shapes by scope using the service's id, like shopify-admin:Customer, or you can reference them by namespace, like Shopify_Customer.
Attaching a customer from the Shopify Admin API to the above Profile shape is as simple as adding a property with an "@ref" that maps to either shopify-admin:Customer or Shopify_Customer as shown below:
"Profile": {
    "id": "Profile",
    "name": "Profile",
    "title": "Profile",
    "schema": {
        "type": "object",
        "properties": {
          "shopifyCustomerData": {"@ref": "Shopify_Customer"},
          "userId": {"type": "string"},
          "reviews": {"@ref": "local:ReviewList"},
          "friends": {"@ref": "local:FriendList"},
          "orders": {"@ref": "local:OrderList"},
        }
    }
}
Remember that creating a shape with a property that references a shape from a service doesn't guarantee the data from that service will be on instances of that shape. In the above example, instances of the Profile shape will not have any Shopify customer data at first. That data has to be mapped to the shopifyCustomerData property somehow.
To avoid manually inserting Shopify customer data every time you create a Profile, you'll need to specify in your schema how customer data can be fetched. You can use "@resolver" to solve this problem. Read on to the next section to find out how.
Extending data
You can attach data from a remote API to your shape using an "@resolver" property.
For example, you might want to create a Product shape with data that doesn't exist in Shopify, while still associating each Product instance with a specific Shopify product. That is to say, you'd like to extend the Product shape with Shopify product data. Prior to adding Shopify data, your Product shape might look like this:
"Product":{
    "id":"Product",
    "title":"Product",
    "name":"Product",
    "schema": {
        "type": "object",
        "properties": {
            "resellable": {"type": "boolean"},
            "resalePrice": {"type": "number"}
        }
    }
}
The above Product has a "resellable" boolean that can be used to mark whether a product is available for resale, and a "resalePrice" number that specifies the resale price. This is just an example of two properties that you may want that don't exist in Shopify.
To fetch a particular product from Shopify whenever an instance of Product is queried, you'd need to add two properties. One will represent the argument that will be used in the Shopify Product query, and one will represent the product data Shopify will return.
These two properties could be "shopifyProductId", to represent the ID of the product you will query, and "shopifyProductData" to represent the Shopify product that will be returned.
Your new Product shape might look like this:
"Product":{
    "id":"Product",
    "title":"Product",
    "name":"Product",
    "schema": {
        "type": "object",
        "properties": {
            "shopifyProductId": {"type":"string"},
            "shopifyProductData": {
                "@ref": "local:Shopify_Product",
                "@resolver": {
                  "name": "graphql:query",
                  "service": "shopify-storefront",
                  "if": "$source.shopifyProductId",
                  "fieldName": "product",
                  "args": {
                    "ops": [{"path": "id", "mapping": "$source.shopifyProductId"}]
                  }
                }
            },
            "resellable": {"type": "boolean"},
            "resalePrice": {"type": "number"}
        }
    }
}
In the above example, a "shopifyProductId" property has been added. The value for this string property would need to be provided in any createProduct mutation that creates an instance of a Product shape. If the provided "shopifyProductId" value isn't valid (ex: "gid://shopify/Product/10079785100"), then the query to fetch "shopifyProductData" will fail, and that field will be null on the Product instance when it's fetched.
Every time you fetch a Product with a valid "shopifyProductId" value, a GraphQL query to Shopify Admin's product field will be executed, mapping the value of "shopifyProductId" to the "id" argument. This allows a Shopify product that corresponds to the product ID to be fetched and attached to each instance of the custom Product shape.
You could then run a getProduct query like the one shown below. All valid fields in a product query to the Shopify Admin API are available as subfields on shopifyProductData.
getProduct(_id: "abc123"){
    shopifyProductId
    shopifyProductData{
        id
        title
        sellingPlanGroupCount
    }
    resellable
    resalePrice
}
When using "@resolver", remember that the query in the resolver only has access to data exposed in the selection set.
In the above example, shopifyProductData would return null if shopifyProductId was not included in the selection set.
The are many more possible applications of this functionality. Using "@resolver" allows you to attach a resolver to any shape property. You can learn how to configure resolvers in our queries and mutations guide, or in our schema spec reference.
Because each "@resolver" runs a query, that means every query that fetches a shape with an "@resolver" property must run a nested query before it can send a response. As a result, having too many "@resolver" properties can slow down queries that might otherwise be fast.
API Indexing is one solution. Query data from any API on an interval, or when a webhook fires—then cache it, so you can fetch it from the ShapeDB index much faster.
Check out our API Indexing guide to learn more.
You may also find yourself wanting to do the opposite by extending API data with ShapeDB data. For example, since Shopify has such a robust and well-documented API already, you may prefer to augment the data Shopify gives you with ShapeDB data. That way you can use Shopify's products query to fetch a list of products, but they'll all have custom data from ShapeDB as well as the standard Shopify data.
The "extends" property helps you do this, and you can learn more in the next section.
Extending API data
A useful companion to "@resolver" is "extends". The "@resolver" property allows you to attach data from remote services to a shape by querying for that data whenever an instance of that shape is fetched. You can read more about "@resolver" in the section above.
The "extends" property allows you to import all properties from a shape into a new one.
For example, if you have a shape called Product, and you want to create a new ResellableProduct shape that inherits all properties from Product, you could use "extends" as shown below:
"ResellableProduct": {
    "schema": {
        "extends": [
            {"@ref":"local:Product"},
            {
                "type":"object",
                "properties": {
                    "resellable": {"type":"boolean"},
                    "resalePrice": {"type":"number"},
                }
            }
        ]
    }
}
To extend a shape, you must use "@ref" to reference it, and scope it to indicate where the shape can be found. Since we're assuming Product is defined locally in your schema, you scope it with local:. If Product existed on an external service, like Stripe, you would scope it with the id of the service, as in stripe-service-id:Product. The service's ID is usually determined by the value you entered into the Slug field in the service page when first connecting it. Learn more in the service schema section of this guide.
"extends" also allows you to add new properties to service schema shapes. Service schema shapes don't appear in your JSON schema, but are available to be referenced by your queries, mutations, and shapes. They are derived from the types defined in any GraphQL API service you connect to your project (if the API allows introspection).
Let's imagine you'd like to add a new property to "Shopify_Product". This property will be available as a field when querying for products from Shopify, as if it was part of the Shopify Admin API spec.
So if you added myCustomProperty using "extends", you could then do this when querying a product from Shopify:
{
  Shopify_product(id: "abc123") {
    myCustomProperty
    id
    title
  }
}
Even if you extend Shopify products with a myCustomProperty property, you cannot query Shopify with only that custom property in the selection set. When querying a service API, you must always include one field in the selection set that is valid in the API's official spec.
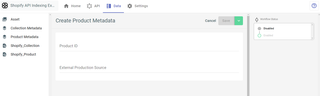
Add a custom "metadata" property. The property will be an object with an "externalProductionSource" string attribute.
Want to follow along with a sample project? Deploy the Shopify API Indexing pattern, where everything described in this section is already implemented.
After connecting the Shopify Admin API to your project, you can add the metadata property to products from Shopify by defining "Shopify_Product" in your JSON schema manually. If "Shopify_Product" exists in your JSON schema, then any modifications you make to the shape will be reflected in queries that return instances of the "Shopify_Product" shape.
A simple definition of "Shopify_Product" should look like this:
"Shopify_Product": {
    "id": "Shopify_Product",
    "name": "Shopify_Product",
    "title": "Shopify_Product",
    "schema": {
        "extends": [
            {"@ref": "shopify-admin:Product"}
        ]
    }
},
In the above example, "extends" allows you to import all properties from the Shopify Admin API's "Product" type. Shapes from connected services can be namespaced, like "ShopifyStorefront_Product" and "BigCommerce_Product", or scoped with the "id" of the service, like "shopify-admin:Product" or "shipengine:Shipment". When extending a shape, you must use the service's ID to scope the shape that's being extended.
Learn more about referencing shapes from services in the service schema section of this guide.
Now to add new properties to the "Shopify_Product" shape, you must add a new object to the "extends" array. This object should look exactly like the object that would normally appear in a Shape's schema.
"Shopify_Product": {
    "id": "Shopify_Product",
    "name": "Shopify_Product",
    "title": "Shopify_Product",
    "schema": {
        "extends": [
            {"@ref": "my-shopify-shop:Product"},
            {
                "type": "object",
                "properties": {
                    "metadata": {
                        "type":"object",
                        "properties": {
                            "externalProductionSource": {
                                "type":"string"
                            }
                        }
                    }
                }
            }
        ]
    }
},
In the above example, we've attached a "metadata" property to the "Shopify_Product" shape and given it an "externalProductionSource" attribute. If we stopped here, this value would always be empty, because there is no way to input this data. Shopify's product creation UI does not have a "metadata" category with an "externalProductionSource". Use the built-in data modeling functionality.
You can create a ProductMetadata shape in the shape editor. Give it a productId property to store the Shopify ID of the product it will be associated with. Give it an externalProductionSource property that takes a string value. When you create an instance of this shape, you can provide the relevant Shopify product ID and specify the external production source.
Then, to fetch a corresponding ProductMetadata instance whenever a Shopify_Product is fetched, you would use "extends" and "@resolver" together as shown below:
"Shopify_Product": {
    "id": "Shopify_Product",
    "name": "Shopify_Product",
    "title": "Shopify_Product",
    "schema": {
        "extends": [
            {"@ref": "my-shopify-shop:Product"},
            {
                "type": "object",
                "properties": {
                    "metadata": {
                        "@ref": "local:ProductMetadata",
                        "@resolver": {
                            "name": "shapedb:find",
                            "service": "shapedb",
                            "if": "$source.id",
                            "shapeName": "ProductMetadata",
                            "args": {
                                "ops": [
                                    {"path": "where.productId.eq", "mapping": "$source.id"}
                                ]
                            }
                        }
                    }
                }
            }
        ]
    }
}
In the above example, the value of the id field on the Shopify_Product instance is being used to find an instance of ProductMetadata with a matching productId field value. Read about "@resolver" in the section of this guide on extending ShapeDB data. Read about "extends" in the section of this guide on extending API data.
With the above configuration, you could query for your custom metadata by using the Shopify_products query already defined in your Service Schema:
{
  Shopify_product(id: "abc123") {
    id
    title
    metadata {
      productId
      externalProductionSource
    }
  }
}
Extending to modify default behaviors
In some cases you'll want to extend a Shape provided by a third-party service to alter the behavior of the
schema in some way. In these cases it's important to restore any @mapping properties that the original Shape may have
had, otherwise you may run into issues accessing data.
In the following example, the @mapping property is used to find episode data in the upstream request. This would
have been set automatically on the original shape, but now that you're extending it you will need to add it explicitly.
{
  "Rick_Character": {
    "id": "Rick_Character",
    "name": "Rick_Character",
    "title": "Rick Character",
    "schema": {
      "extends": [
        { "@ref": "rick:Character" },
        {
          "type": "object",
          "properties": {
            "episode": {
              "type": "array",
              "items": {
                "@ref": "rick:Episode",
                "@mapping": "rick:Episode.episode"
              }
            }
          }
        }
      ]
    }
  }
}
Examples
Basic Shape example
The most basic shape requires an id, name, title and schema. See the section on schemas in this guide to learn more.
"Product": {
    "id": "Product",
    "name": "Product",
    "title": "Product",
    "schema": {
        "type": "object",
        "properties": {
            "price":{"type":"number"},
            "title":{"type":"string"}
        }
    }
}
Complex Shape example
More complex shapes make use of "extends" to extend data fetched from remote services like Shopify. They also use "@resolver" to define how that data is fetched.
"ExtendedShopifyProduct": {
    "id": "ExtendedShopifyProduct",
    "name": "ExtendedShopifyProduct",
    "title": "ExtendedShopifyProduct",
    "schema": {
        "type": "object",
        "properties": {
            "items": {
                "extends": [
                    {"@ref":"Shopify_Product"},
                    {
                        "type":"object",
                        "properties": {
                            "storefrontData": {
                                "@ref": "shopify-storefront:Product",
                                "@resolver": {
                                    "name": "graphql:query",
                                    "service": "shopify-storefront",
                                    "if": "$source.handle",
                                    "fieldName": "productByHandle",
                                    "args": {
                                        "ops": [{"path": "handle", "mapping": "$source.handle"}]
                                    }
                                }
                            }
                        }
                    }
                ]
            }
        }

    }
},
The above example defines an ExtendedShopifyProduct shape that uses "@ref" to inherit all properties from "Shopify_Product", then uses "@resolver" to define how data from Shopify Storefront can be fetched for each instance of ExtendedShopifyProduct. In this case, whenever ExtendedShopifyProduct is fetched, a corresponding Shopify Storefront product with the same handle will be fetched.
This configuration is useful for composable e-commerce Shopify deployments that require the Shopify Admin API, but need Shopify Storefront's product information to create checkouts and carts.
Generated Shape example
Below is an example of a shape created in the shape editor. Every time you create a shape in the editor, it will be automatically added to your project schema.
"Homepage": {
    "id": "BA3ccJdIb",
    "name": "Homepage",
    "title": "Homepage",
    "model": {"type": "single"},
    "schema": {
        "type": "object",
        "properties": {
            "title": {
                "type": "string",
                "title": "Title",
                "minLength": 0,
                "@mapping": "shapedb:Homepage.BJfmu0OIZ"
            },
            "featuredCollections": {
                "title": "Featured Collections",
                "@mapping": "shapedb:Homepage.SJSRmG8r7",
                "items": {"@ref": "local:Collection"},
                "@backreference": {"enabled": true},
                "type": "array",
                "@input": {
                    "type": "array",
                    "items": {"@ref": "local:TSRelationship"}
                },
                "@args": "TSRelationshipArgs",
                "@resolver": {
                    "name": "shapedb:getRelated",
                    "service": "shapedb",
                    "options": {"nullable": true}
                }
            },
            "hero": {
                "title": "Hero",
                "@mapping": "shapedb:Homepage.ry4VnCD8W",
                "$ref": "#/shapes/HomepageHero/schema"
            }
        }
    }
},
In general, unless you need to use "extends" or "@resolver" to extend your shape, it's not recommended to edit a generated shape from within the JSON editor. Changes to a generated shape from the JSON schema can render that shape no longer valid for editing in the shape editor.
Still need help? Get in touch with us.