Queries and Mutations
Creating queries and mutations in your project enables you to fetch and mutate data from multiple services in a single API call. With the right configuration, a query can fetch user-scoped data using authenticated credentials, or a mutation can update data in one service using the response from another.
There are three ways to add queries and mutations to your project schema.
The first is by creating a shape in the workbench. When you create a shape, queries and mutations for fetching and mutating that shape are generated in your schema. Learn more about this in our guide on working with shapes.
The second way to add queries and mutations to your project schema is by importing them from a service. Once you've successfully connected a generic GraphQL service, or any of the officially supported services in our service list, you can import queries from that service. For example, if you use the ShipEngine service, you can import the listShipments query from the ShipEngine REST API. Learn more in our services quick-start guide.
The third way to add queries and mutations to your project is by manually editing your schema. You can edit the schema in your browser using the built-in editor, or you can export your schema, edit it in your favorite code editor, and reimport it. Learn more about editing your schema here.
In your project's JSON schema, queries and mutations are objects you place in your "queries" or "mutations" properties, which are root-level in your schema file. For example, if you had a query that fetched products from an API, and a mutation that added products to a cart, your "queries" and "mutations" might look like this:
{
  "queries": {
    "listProducts": {}
  },
  "mutations": {
    "addToCart": {}
  }
}
But the above listProducts and addToCart queries are empty. To make them work, each require the same two properties:
"shape""resolver""args"(optional, but usually required for mutations)
Shapes
Your query or mutation's shape describes the data the query or mutation will return. For example, if your listProducts query will return an object with a root-level property called products that contains an array of product objects, you need to indicate that with the "shape" property.
A query or mutation's "shape" property only takes a string as its value. This string should be the "name" of the shape the query or mutation will return. The shape must either be a type that already exists in the service you're querying, or must be configured in your root-level "shapes" object.
For example, a listProducts query returns a list of products, which means the shape might be named "ProductList". Unless ProductList is already defined in a service connected to your project, you'll have to edit the root-level "shape" object in your schema to add a "ProductList" shape.
For example, if the response for your listProducts query looks like this:
{
  "products": [
    {
      "product_id": 123,
      "title": "example product 1",
      "price": 44.99
    },
    {
      "product_id": 456,
      "title": "example product 2",
      "price": 1.99
    }
  ]
}
Then you might define a custom ProductList shape like this:
"shapes": {
  "ProductList": {
    "id": "ProductList",
    "name": "ProductList",
    "title": "ProductList",
    "schema": {
      "type": "object",
      "properties": {
        "products": {
          "type": "array",
          "items": {
            "type":"object",
            "properties": {
              "product_id": {"type":"string"},
              "title": {"type":"string"},
              "price": {"type":"number"}
            }
          },
          "title": "products"
        }
      }
    }
  }
}
You can learn more about creating shapes by checking out our shape guide.
Service schema shapes
Shapes for a connected service may be auto-generated. Auto-generated shapes will not be visible in a project schema, but will be available to any queries or mutations that are defined.
You can see these shapes in the Docs Panel by selecting the docs button above your API Explorer in the API Tab. Search for the service you're interested in using. You'll see a list of types with the service's namespace prepended to the front of them. These types are also shapes available to your schema.
For example, if you connect the Shopify Admin API using our Shopify Admin provider, you'll find a list of available shapes with Shopify_ prepended to the front. For example, Shopify_Product or Shopify_Collection. In this case, Shopify is the namespace for these types.
You can set the "shape" of your query to any of these namespaced types without having to manually define them. For example, you might have a query that requires authentication through Auth0, then returns customer data from Shopify. Your query's "shape" would be "Shopify_Customer". Your query's "resolver" would only run if the query is called with Auth0's authenticated $claims in the headers.
"getAuthenticatedCustomer": {
  "shape": "Shopify_Customer",
  "resolver": {
    "if":"!isEmpty($claims.sub)",
    "id": "getAuthenticatedCustomerById",
    "name": "graphql:query",
    "service": "shopify-admin",
    "fieldName": "customer",
    "args": {
      "ops": [
        {
          "path": "id",
          "mapping": "$args.id"
        }
      ]
    }
  },
  "args": {
    "type": "object",
    "properties": {
      "id": {"type":"string"}
    }
  }
}
Alternatively, you can scope a service's type based on the service's ID. For example, if your Shopify Admin service has an id of shopify-admin, you can set the "shape" of a query that returns a shopify product to "shopify-admin:Product" instead of "Shopify_Product".
Check your root-level "services" object in your schema to see any service's id.
"services": {
    "shopify-admin": {
      "title": "Shopify Admin",
      "namespace": "Shopify",
      "provider": "shopify",
      "serviceType": "graphql",
      "authenticationType": "oauth2Bearer",
      "options": {
        "shop": "your-shop-name",
        "endpoint": "your-endpoint",
        "shopifyPlus": false
      },
      "id": "shopify-admin",
      "authentication": "aBc1two3XyZalphaBetacappa"
    }
}
You can navigate to a service's page by selecting it in the Patterns & Services list. The slug property is the service's ID.
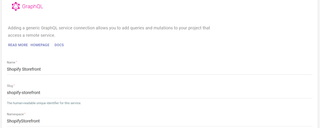
Shapes from generic GraphQL services that allow introspection are auto-generated. For example, connecting the Shopify Storefront API using the generic GraphQL provider allows you to set the "shape" property of your queries and mutations to any type in the Storefront API.
"shape":"shopify-storefront-service-id:Product"- Or
"shape":"ShopifyStorefrontNamespace_Product
If you set your Storefront service's id to my-shopify-storefront and the namespace to MyShopifyStorefront, the above examples look like this:
"shape":"my-shopify-storefront:Product"- Or
"shape":"MyShopifyStorefront_Product
Remember that you can define your generic GraphQL service's namespace or ID on the service page. The Slug will be the service's ID.
Resolvers
Your query or mutation's resolver describes how your query will fetch data, or how your mutation will create, update or delete data.
Learn how to configure resolvers in our resolver guide. You can also check out the section on resolvers in our schema spec reference.
Resolver examples
Mutations
Let's imagine you'd like to update a Shopify customer with the Shopify Storefront API. To update a customer with Shopify's Storefront API, you need a customerAccessToken.
So let's say you create your own updateCustomer mutation in a project schema. Your updateCustomer mutation would need to execute the Storefront API's customerAccessTokenCreate mutation first, then use the accessToken returned by that mutation as an argument when calling Shopify Storefront's customerUpdate mutation.
Your "resolver" might look like this:
"resolver": {
  "compose": [
    {
      "id": "createAccessToken",
      "name": "graphql:mutation",
      "service": "shopify-storefront",
      "fieldName": "customerAccessTokenCreate",
      "args": {
        "ops": [
          {
            "path": "email",
            "mapping": "$args.email"
          },
          {
            "path": "password",
            "mapping": "$args.password"
          }
        ]
      }
    },
    {
      "if": "!isEmpty($resolvers.createAccessToken.customerAccessToken.accessToken)",
      "id": "updateCustomer",
      "name": "graphql:query",
      "service": "shopify-storefront",
      "fieldName": "customerUpdate",
      "args": {
        "ops": [
          {
            "path": "customerAccessToken",
            "mapping": "$resolvers.createAccessToken.customerAccessToken.accessToken"
          },
          {
            "path":"customer",
            "mapping": "$args.customerUpdateDetails"
          }
        ]
      }
    }
  ],
  "results": {
    "ops": [{"path": "$", "mapping": "$resolvers.updateCustomer"}]
  }
}
The above resolver uses an email and a password that must be passed to the mutation via its arguments. In your frontend code, the mutation might look like this:
const UpdateCustomer = gql`
  mutation UpdateCustomer($email: String!, $password: String!) {
    updateCustomer(email: $email, password: $password) {
      customer {
        id
        firstName
        lastName
      }
    }
  }
`;
Learn how to configure args for your queries in the args section below.
Queries
Consider how you might fetch a list of product subscriptions from an API that requires a customer's ID to return their subscription list. If you don't have the ID already, you'll have to query for it first, then use the ID in the response to query for the subscription list.
For example, Recharge is a popular e-commerce subscription API. To fetch a list of a customer's subscriptions in their API, you must append a customer_id, address_id or shopify_customer_id as a query parameter to the GET query you send to them.
Assuming you don't have the customer's Shopify ID, you'll have to query Recharge for the ID based on some other information, like the customer's email. Then you'd take the ID in the response from that query and use it as a query parameter in the query for the list of subscriptions.
This is how your resolver might look:
"resolver": {
  "compose": [
    {
      "id": "customerByEmail",
      "name": "rest:get",
      "service": "recharge",
      "path": "/customers",
      "searchParams": {
        "ops": [{"path": "email", "mapping": "$claims.email"}]
      }
    },
    {
      "id": "listSubscriptions",
      "name": "rest:get",
      "service": "recharge",
      "path": "/subscriptions",
      "searchParams": {
        "ops": [
          {
            "path": "customer_id",
            "mapping": "$resolvers.customerByEmail.customers[0].id"
          }
        ]
      }
    }
  ],
  "results": {
    "ops": [
      {
        "path": "$",
        "mapping": "get", {"path": "$resolvers.listSubscriptions"}
      }
    ]
  }
}
Args
You can also add an "args" property to your queries or mutations, which allows you to specify your query or mutation's arguments.
For example, if you have a query that updates customers, you may need the customer's email address and password, and an object that specifies which customer details to update.
Your "args" might look like this:
"args": {
  "type": "object",
  "properties": {
    "email": {"type": "string"},
    "password": {"type": "string"},
    "customerUpdateDetails": {
      "type":"object",
      "properties": {
        "firstName": {"type": "string"},
        "lastName": {"type": "string"},
        "description": {"type": "string"},
        "defaultAddress": {"type": "string"}
      }
    }
  }
}
Learn more about configuring arguments in our schema spec reference.
Query example
Below is a full example of a query that fetches user-scoped subscription data from the Recharge subscriptions API. Because a customer ID is required to fetch subscriptions, the resolver finds the customer by email address, then uses the ID from the response to request that user's subscriptions.
Recharge is a REST API, and bundling these two queries into one query in the GraphQL API simplifies frontend code.
"getMySubscriptions": {
  "shape": "Recharge_SubscriptionList",
  "resolver": {
    "results": {
      "ops": [
        {
          "path": "$",
          "mapping": "get", {"path": "$resolvers.listSubscriptions"}
        }
      ]
    },
    "compose": [
      {
        "id": "getCustomerByEmail",
        "name": "rest:get",
        "service": "recharge",
        "path": "/customers",
        "searchParams": {
          "ops": [{"path": "email", "mapping": "$claims.email"}]
        }
      },
      {
        "id": "listSubscriptions",
        "name": "rest:get",
        "service": "recharge",
        "path": "/subscriptions",
        "searchParams": {
          "ops": [
            {
              "path": "customer_id",
              "mapping": "$resolvers.customerByEmail.customers[0].id"
            }
          ]
        }
      }
    ]
  },
  "description": "Get my subscriptions"
},
When querying a REST API, you must define shapes for its data manually. For example, the Recharge_SubscriptionList shape in the getMySubscriptions query above must be configured in your root-level shapes for this query to work. Learn more in our shapes guide.
Mutation example
Below is a full example of a mutation that updates a customer's data with the Shopify Storefront API. Because Shopify Storefront requires a customerAccessToken to mutate customer data, this query's resolvers use the Storefront API's customerAccessTokenCreate mutation to generate one. Data from the mutation's arguments are then used to update the customer's data.
"updateCustomer": {
  "shape": "shopify-storefront:CustomerUpdatePayload"
  "resolver": {
    "compose": [
      {
        "id": "createAccessToken",
        "name": "graphql:mutation",
        "service": "shopify-storefront",
        "fieldName": "customerAccessTokenCreate",
        "args": {
          "ops": [
            {
              "path": "email",
              "mapping": "$args.email"},
            {
              "path": "password",
              "mapping": "$args.password"
            }
          ]
        }
      },
      {
        "if": "!isEmpty($resolvers.createAccessToken.customerAccessToken.accessToken)",
        "id": "updateCustomer",
        "name": "graphql:query",
        "service": "shopify-storefront",
        "fieldName": "customerUpdate",
        "args": {
          "ops": [
            {
              "path": "customerAccessToken",
              "mapping": "$resolvers.createAccessToken.customerAccessToken.accessToken"
            },
            {
              "path":"customer",
              "mapping": "$args.customerUpdateDetails"
            }
          ]
        }
      }
    ],
    "results": {
      "ops": [{"path": "$", "mapping": "$resolvers.updateCustomer"}]
    }
  },
  "args": {
    "type": "object",
    "properties": {
      "email": {"type": "string"},
      "password": {"type": "string"},
      "customerUpdateDetails": {
        "type":"object",
        "properties": {
          "firstName": {"type": "string"},
          "lastName": {"type": "string"},
          "description": {"type": "string"},
          "defaultAddress": {"type": "string"}
        }
      }
    }
  }
}
Calling queries in an app
Now that you know how to create queries and mutations, all you need to know is how to call these queries and mutations from your application.
We have many guides for that, but here is a good starting point
Still need help? Get in touch with us.