Contentful
Integrating Contentful's API with your project will allow you to have one source of information from all the APIs you use and all the content you create.
Let's get started connecting Contentful to your project.
Don't have a project yet? Check out this guide for setting one up.
Connecting Contentful
The first step to connecting Contentful is navigating to the admin UI. You'll want to log in, and select the project you'd like to connect Contentful to.
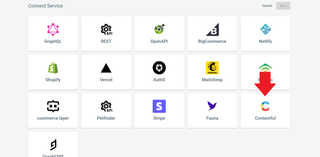
In the home tab of your project's dashboard, at the top, you'll see a section with a button that says "Add a service". Select that button to begin.

Now you'll be presented with a list of services to choose from. Choose Contentful.
Next you'll see a form that you'll have to fill out to connect your Contentful space to your project. We're almost done already.
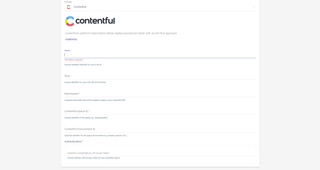
In the Name field, choose the name you'd like to give this service. For the Namespace, choose what you'd like your contentful queries to be prefixed by. For example, if you choose the namespace Contentful, your query for getting a list of all your pages might look like Contentful_pageList.
Next, you'll have to enter your Contentful space ID. In a new browser tab, go to your Contentful space dashboard, and hover your mouse over the settings option. When the dropdown appears, select API Keys.
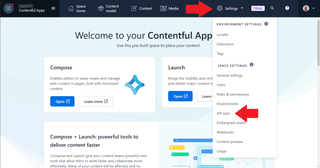
You should see a page with information about a new API Key you're generating. Find the section marked Space ID and copy the ID. Do not close this tab yet.
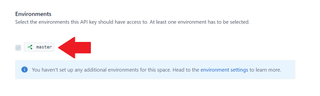
Let's go back to your project and put that into the Contentful Space ID section of the form. The next line to fill out is the Contentful Environment ID.
Now back in our Contentful tab, if you scroll down, you'll see a section labeled Environments. Here you may see a word like "master", or "preview". That's your Environment ID.
Paste that into the Contentful Environment ID field in the service configuration form.
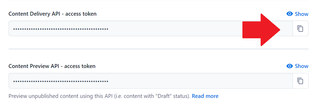
Finally, navigate back to your Contentful tab and you'll see a Content Delivery API - access token section. Copy this and paste it into the Authentication field of your service configuration form.
Now scroll to the top of this page in the admin UI, and select Save in the top right.
Adding queries and mutations from Contentful
Once you've connected your service, you should immediately be presented with a page listing all the queries and mutations available to you from your Contentful space.
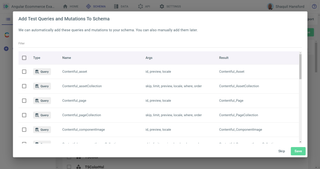
Select whichever queries or mutations you'd like to add, then select the Save button in the bottom right. For this example, we'll just add all queries and mutations by hitting the checkbox in the top left.
If you did not see a list of queries and mutations after adding your service, you may have entered some incorrect information. Please start the process over and try again.
You may also have to wait if you just created a Contentful space. For the first few minutes after your Contentful space is created, queries and mutations may not be immediately found.
You can give it a moment, then navigate to your Schema tab at the top of the project dashboard. Select on the Contentful option on the left, then scroll to the bottom of the Connect Service page and select the Select Contentful Queries/Mutations button.


Testing your Contentful API
Alright, you're all connected. Now what?
Well, now we'll navigate to our API Explorer in the project dashboard. Select the API tab near the top of the page.
You should be taken to a GraphQL playground where you can test out your queries and mutations.
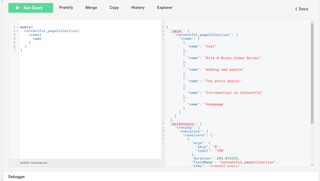
Let's run an example query. We're going to get a collection of our pages from Contentful, with the names of each. Here's our query:
query {
  Contentful_pageCollection {
    items {
      name
    }
  }
}
The result should be:
{
  "data": {
    "Contentful_pageCollection": {
      "items": [
        {
          "name": "test"
        },
        {
          "name": "Bits & Bytes Video Series"
        },
        {
          "name": "Adding new assets"
        },
        {
          "name": "The entry editor"
        },
        {
          "name": "Introduction to Contentful"
        },
        {
          "name": "Homepage"
        }
      ]
    }
  }
}
Now your Contentful API is intertwined with the rest of your API Mesh.
Still need help? Get in touch with us.