Hygraph
This guide will demonstrate how you can integrate your Hygraph Content API into your project.
Don't have a project yet? Check out this guide for setting one up.
If you want to follow along with this guide, use our Online Shop starter project. That's what this doc will be based on.
Connecting Hygraph
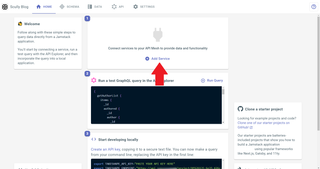
To connect Hygraph to your project, first you'll need to navigate to the admin UI. After logging in, select the project you'd like to connect Hygraph to.
In the home tab of your project's dashboard, at the top, you'll see a section with a button that says "Add a service". Select that button to begin.
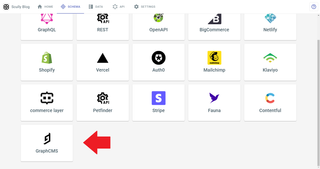
Now you'll be presented with a list of services to choose from. Choose Hygraph.
This will take you to the Connect Service form, where you can connect your Hygraph project's Content API.
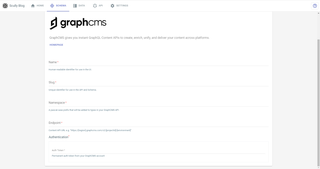
The Name, Slug and Namespace can be anything you want, but for our example we'll be using a Name of Hygraph, a Slug of hygraph, and a Namespace of Hygraph.
Almost done. Now we need our Endpoint and API Key. Let's look at how to get those next.
Setting up your Hygraph project
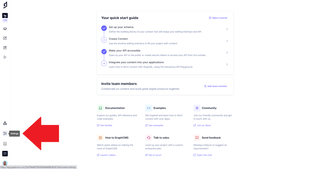
To start, you'll need a Hygraph project with a environment already set up. If you don't have one already, you can use one of their starters. Create a new project, and you'll be shown a list of starter templates:
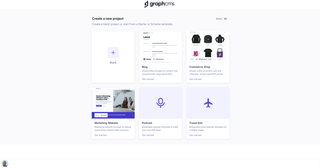
For this example, we're using the Hygraph Commerce Shop Starter project.
Now open your Hygraph project in a new tab. We'll be transferring information from there to your API project.
Getting your content API endpoint
Although this example works equally well if you want to use the Management API, we're going to use our Hygraph project's Content API.
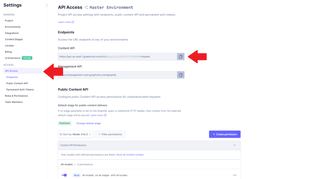
In the Hygraph navbar, select on settings.
Near the bottom of the list of options that will emerge from the navbar, you'll find the API Access option. When you select that, you'll see a page for managing your API access keys and endpoints. Copy the endpoint under the Content API heading.
Now switch back to your Connect Service tab.
Paste that in under Endpoint. All that's left is the authentication token.
Creating your Hygraph auth token
You can read detailed instructions on creating and managing your Hygraph authentication tokens in their documentation. For our purposes, all you need to do is create a Permanent Auth Token.
Scroll to the bottom of the API Access settings page.
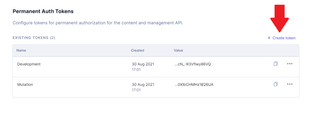
You'll see a section called Permanent Auth Tokens, where there's a button that says + Create token. Select that button, and call your Auth Token whatever you'd like. For this example, we'll call it APIMesh.
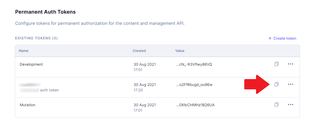
You'll then want to select the copy button next to your new auth token.
Switch back to your Connect Service tab in your project, and paste that into the Authentication field.
Now scroll to the top of the page, and you'll see a Save button. Select that, and get ready to add your queries and mutations.
Testing your Hygraph queries
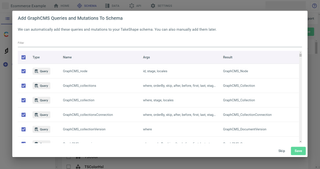
Once you've connected your Hygraph service, you'll be taken back to the Schema tab of your project. A modal will pop up, containing a list of all queries and mutations listed in your Hygraph Content API schema. Select the ones you'd like to add to your project schema.
For our example, we'll be adding them all.
Now navigate to the API tab of your project, and choose API Explorer in the menu that will open on the left. You'll be shown a GraphQL playground where you can experiment with your new schema.
For this example, let's fetch a list of products, retrieving their name and price.
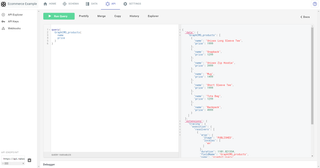
On the left, you'll want to enter the code below:
query {
  Hygraph_products {
    name
    price
  }
}
And on the right, you'll get the result below:
{
  "data": {
    "Hygraph_products": [
      {
        "name": "Unisex Long Sleeve Tee",
        "price": 1999
      },
      {
        "name": "Snapback",
        "price": 1299
      },
      {
        "name": "Unisex Zip Hoodie",
        "price": 3999
      },
      {
        "name": "Mug",
        "price": 1499
      },
      {
        "name": "Short Sleeve Tee",
        "price": 1999
      },
      {
        "name": "Tote Bag",
        "price": 1299
      },
      {
        "name": "Backpack",
        "price": 4999
      }
    ]
  }
}
You have now connected a Hygraph ecommerce project to your project schema.
Still need help? Get in touch with us.