Creating a Landing Page with Shape Arrays
If you want to use it for a simple landing page. What's the best way to do that?
You should try our Shape Arrays. A shape array is exactly what it sounds like: An array of shapes. You customize the shapes that will go into the array, then edit data them from the admin UI.
This allows you to fetch the data from your project API and inject it into your landing page.
We'll show you how to go through that process with this doc.
Follow along with this guide by checking out our starter project repo. Our starters let you instantly deploy a pre-configured project.
Setting up your project
To get started, you'll need a project. Don't have a project yet? Check out this guide for setting one up. Already have a project? Then all you have to do is log in to your account through the admin UI to select your project.
Once you've created or selected your project, you're ready to create your Shape array.
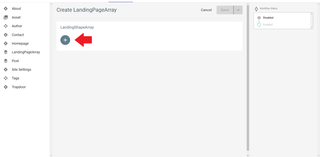
Creating your Shape Array
To get started, navigate to the Schema tab. You'll see a summary of your project's schema. If you haven't set up any shapes yet, everything you see will be auto-generated shapes.
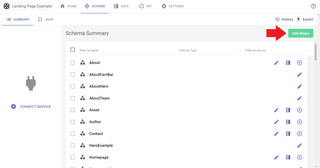
You'll see a button at the top right of the page that says Add Shape. Select that to begin creating your Shape Array.
Creating the individual shapes
Before you can make an array of shapes, you need some shapes to actually go into the array.
The only unique thing about shapes inside a Shape Array is that their Built-in Data Storage option must be set to None. Other than that, you can create any Shape you want.
For this example, we'll create three shapes:
- SectionExample
- OfferExample
- TestimonialExample
Each one is just an example of the kind of shape you might use for the different areas of your landing page. Let's get started.
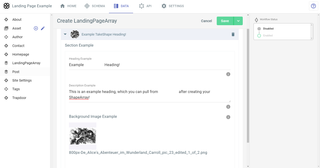
Section Example
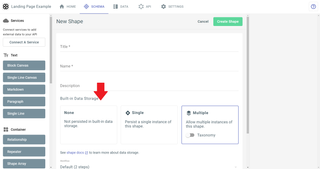
Our SectionExample shape is simple. Select the Add Shape button on the top-right of the page to begin.
You'll be taken to the shape creation page, where you'll see a form you can fill out. For the Title, you can choose whatever you want, but we'll be using "SectionExample". We'll use "SectionExample" again for the Name. For the Description, "An example of a landing page section".
Remember, for the Built-in Data Storage option, you must set it to None.
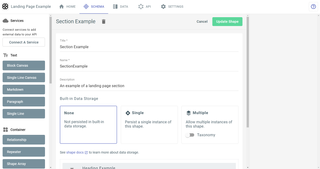
Below that, you'll see a section where you can drag and drop field and data widgets that will be on your SectionExample shape.
We're choosing the Single Line, Paragraph and Asset field and data widgets.
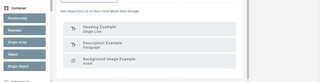
-
Our
Single Linewidget has a title of "Heading Example" and a name of "headingExample". -
Our
Paragraphwidget has a title of "Description Example" and a name of "descriptionExample". -
Our
Assetwidget has a title of "Background Image Example" and a name of "backgroundImageExample".
Once you're all done, select the "Create Shape" button on the top-right of the page.
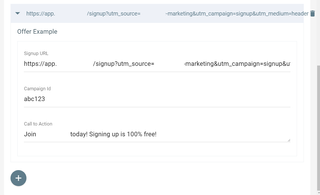
Offer Example
We'll go through the exact same process to create the OfferExample shape.
The Title will be Offer Example, and the Name will be OfferExample
The data and field widgets will be two Single Line elements, and one Paragraph
-
The first
Single Linewill be titledSignup URLand namedsignupUrl -
The second
Single Linewill be titledCampain Idand namedcampaignId -
The
Paragraphwill be titledCall to Actionand namedcallToAction.
Select "Create Shape" in the top right.
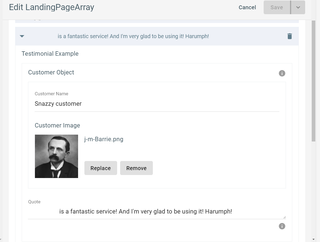
Testimonial Example
And we'll do the same thing to create the Testimonial object.
The Title will be Testimonial Example, and the Name will be TestimonialExample
For the data and fields, we'll use an Object widget, which will have a Single Line and Asset widget inside it. Finally, you'll add a Paragraph widget outside the Object.
-
The first
Objectwill be titledCustomer Objectand namedcustomerObject- The
Single Lineinside theCustomer Objectwill be titledCustomer Nameand namedcustomerName - The
Assetwill be titledCustomer Imageand namedcustomerImage
- The
-
The
Paragraphwill be titledQuoteand namedquote.
Creating the Shape Array
Finally, we'll return to the Schema tab and create a new shape. This will be our Shape Array.
We're going to title ours LandingPageArray and name it LandingPageArray. For the Built-in Data Storage, we'll choose Multiple.
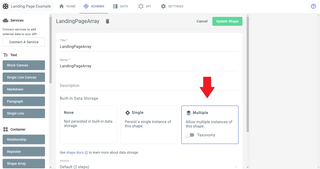
Now you can scroll down to where our widgets go. On the left side, you'll have to scroll through the widgets list to find the Shape Array option. Drag and drop that down into our shape's widgets.
We'll title our shape LandingShapeArray and name it landingShapeArray.
Almost done.
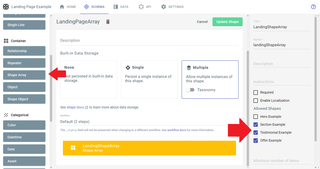
On the right, where you set the Name and Title of your LandingShapeArray, if you scroll down you'll see a list called Allowed Shapes. Here you should see all the shapes in your schema that have a Built-in Data Storage setting of None. If you've created your shapes properly, all of the shapes you want for your landing page should be there.
For this example, you should see Section Example, Testimonial Example, and Offer Example.
All you have to do is check those boxes, and your Shape Array is done.
Creating the Shape Array data
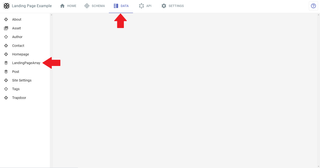
One final step. Select the Data tab at the top of the web client. You'll see a list of options on the left. Select your Shape Array. Ours is called LandingPageArray.
Select on your Shape Array to begin adding data.
In the top right you'll see a button that says New LandingPageArray. Select that to create new data.
You'll be taken to the creation page, where you'll see a large plus button. When you select it, you'll see a dropdown list of all the shapes in your array. Select the Section Example shape first.
Section Example
You'll be presented with fields to fill out.
-
For
Heading Example, we're using "Example Heading." -
For
Description Example, we're using "This is an example heading, which you can pull from a project after creating your ShapeArray." -
For
Background Image, you can upload your own image or choose from one of the project's existing images. To choose a gallery image, drag and drop it from the right to theBackground Imagefield.
In the end, your section example shape should look like this:
To create the next section, select the plus button below the form.
Offer Example
-
For
Signup Url, we'll use "https://app.takeshape.io/signup?utm_source=marketing&utm_campaign=signup&utm_medium=header". -
For
Campaign Id, we'll use "abc123". -
For
Call to Action, we'll use "Join today. Signing up is 100% free."
Testimonial Example
-
For
Customer Name, we'll use "Snazzy customer" -
For
Customer Image, you can upload your own image or choose from one of the project's existing images. To choose a gallery image, drag and drop it from the right to theCustomer Imagefield. -
For
Quote, we'll use"This is a fantastic service. And I'm very glad to be using it. Harumph."
Enable your Shape Array
Before you save your Shape Array, be sure to enable it. In the top right, you'll see a "Workflow Status" section. It should be set to Disabled at first. Select Enabled to make the Shape Array available to your project's API.
Then select save.

Testing your Shape Array
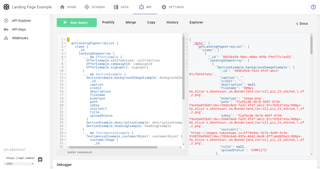
Let's run a quick test of our new Shape Array. On the left side, in the Data tab, you should see the LandingPageArray in a list of other options. Hover your mouse over it, and select the Play button.
If you hover over the Play button, you should see Run getLandingPageArrayList query. This button is going to open the API Explorer for your project and add a full query of every property of your LandingPageArray to the query field.
You still have to hit "Run Query" at the top of the page to see the results of your query.
Your query field should be:
{
  getLandingPageArrayList {
    items {
      _id
      landingShapeArray {
        ... on OfferExample {
          OfferExample_callToAction: callToAction
          OfferExample_campaignId: campaignId
          OfferExample_signupUrl: signupUrl
        }
        ... on SectionExample {
          SectionExample_backgroundImageExample: backgroundImageExample {
            _id
            caption
            credit
            description
            filename
            mimeType
            path
            s3Key
            sourceUrl
            title
            uploadStatus
          }
          SectionExample_descriptionExample: descriptionExample
          SectionExample_headingExample: headingExample
        }
        ... on TestimonialExample {
          TestimonialExample_customerObject: customerObject {
            customerImage {
              _id
              caption
              credit
              description
              filename
              mimeType
              path
              s3Key
              sourceUrl
              title
              uploadStatus
            }
            customerName
          }
          TestimonialExample_quote: quote
        }
      }
    }
  }
}
And the result should be:
{
  "data": {
    "getLandingPageArrayList": {
      "items": [
        {
          "_id": "0d25b458-904c-400a-995b-f9ef17c1ed22",
          "landingShapeArray": [
            {
              "SectionExample_backgroundImageExample": {
                "_id": "58d638e0-fa33-4fef-a6c2-81c7b9347a5a",
                "caption": "",
                "credit": "",
                "description": null,
                "filename": "800px-De_Alice's_Abenteuer_im_Wunderland_Carroll_pic_23_edited_1_of_2.png",
                "mimeType": "image/png",
                "path": "f2af6c8b-5618-405f-8730-f5e45a035b07/dev/58d638e0-fa33-4fef-a6c2-81c7b9347a5a/800px-De_Alice's_Abenteuer_im_Wunderland_Carroll_pic_23_edited_1_of_2.png",
                "s3Key": "f2af6c8b-5618-405f-8730-f5e45a035b07/dev/58d638e0-fa33-4fef-a6c2-81c7b9347a5a/800px-De_Alice's_Abenteuer_im_Wunderland_Carroll_pic_23_edited_1_of_2.png",
                "sourceUrl": "https://images.<domain>.<tld>/6f78e8ac-527a-4e09-9c5e-510876b096bf/dev/7836cba0-05fe-4042-8ed0-8ff1abd895e5/800px-De_Alice's_Abenteuer_im_Wunderland_Carroll_pic_23_edited_1_of_2.png",
                "title": null,
                "uploadStatus": "COMPLETE"
              },
              "SectionExample_descriptionExample": "This is an example heading, which you can query after creating your ShapeArray!",
              "SectionExample_headingExample": "Example Heading!"
            },
            {
              "TestimonialExample_customerObject": {
                "customerImage": {
                  "_id": "2ed3a527-29c2-41cb-b35f-5d55f990c8da",
                  "caption": "",
                  "credit": "",
                  "description": null,
                  "filename": "j-m-Barrie.png",
                  "mimeType": "image/png",
                  "path": "f2af6c8b-5618-405f-8730-f5e45a035b07/dev/2ed3a527-29c2-41cb-b35f-5d55f990c8da/j-m-Barrie.png",
                  "s3Key": "f2af6c8b-5618-405f-8730-f5e45a035b07/dev/2ed3a527-29c2-41cb-b35f-5d55f990c8da/j-m-Barrie.png",
                  "sourceUrl": "https://images.<domain>.<tld>/6f78e8ac-527a-4e09-9c5e-510876b096bf/dev/4c0bfc7f-fd8f-418a-a4b8-678e4fb7c041/j-m-Barrie.png",
                  "title": null,
                  "uploadStatus": "COMPLETE"
                },
                "customerName": "Snazzy customer"
              },
              "TestimonialExample_quote": "This is a fantastic service! And I'm very glad to be using it! Harumph!"
            },
            {
              "OfferExample_callToAction": "Join today! Signing up is 100% free!",
              "OfferExample_campaignId": "abc123",
              "OfferExample_signupUrl": "[[baseUrl]]/signup?utm_source=marketing&utm_campaign=signup&utm_medium=header"
            }
          ]
        }
      ]
    }
  },
  "extensions": {}
}
If the data in your results matches the data you entered into your LandingPageArray form, you're all set.
Now you're finally ready to add a Shape Array to your landing page.
Connecting to your project
To connect to your project, you need your API Endpoint and an API key.
If you haven't created a project yet, follow this guide to do so.
If you already have a project, your API Endpoint will be in the admin UI. In the home tab, look for the "Useful Snippets" section.
Copy the API Endpoint and save it somewhere secure.
To get an API Key, you'll have to create one. Read our docs on creating an API Key here.
Setting up your Landing Page
If you already have a landing page set up, you can try one of our various guides for using the GraphQL API on the frontend.
We've got you covered on all bases on the frontend. Here are some of the most common:
And if you're using an SSG, we've got you covered there as well. Some of the most common ones:
If those aren't what you're using, check out our docs. We likely have a guide on integrating the GraphQL API with your favorite framework or SSG.
If you don't have anything set up yet, follow along with this guide.
We'll be building an example using a NextJS template.
Configuring your NextJS project
For this project, we used the Free NextJS Landing Page Template by ixartz on github. It's an open-source landing page template built with Tailwind and TypeScript.
To follow along with this guide, we encourage you to check out our repo with the full project here. But if you want to follow along with this build, you can clone the repo yourself.
git clone https://github.com/ixartz/Next-JS-Landing-Page-Starter-Template
Once you have the repo on your local machine, change directories into it with your terminal, or open the project in your favorite editor.
Setting up environment variables
In the root directory of the project, create a new file called .env. If you're using the starter repo, or the repo this project is based on, there should already be a .gitignore file. If there isn't one, you should create a .gitignore so your .env file is never added to your remote repo if you ever decide to host it elsewhere.
# dependencies
/node_modules

# production
/build

# dotenv local files
.env*.local
In the .env file, we're going to add environment variables that represent our API Endpoint and API Key from your project. Read this section above to learn more.
Your .env file should look like this:
NEXT_PUBLIC_GRAPHQL_ENDPOINT=Your-Endpoint-Here
NEXT_PUBLIC_GRAPHQL_KEY=Your-Key-Here
Fetching data from the template
Now that our template is set up, let's start editing the files to pull our data down and inject it into our components.
Navigate to the src/templates/ directory and open Base.tsx. This is the component where the other components that comprise the template are being rendered. It returns a div that wraps around the Meta component as well as some others.
We're going to pass data as a prop to Meta to render info from our Shape Array into the template.
const Base = () => (
  <div className="antialiased text-gray-600">
    <Meta title={AppConfig.title} description={AppConfig.description} />
    <Hero />
    <VerticalFeatures />
    <Banner />
    <Footer />
  </div>
);
To start, we're going to add much more to the Base component function, so let's redefine it this way:
const Base = () => {
  return (
    <div className="antialiased text-gray-600">
      <Meta title={AppConfig.title} description={AppConfig.description} />
      <Hero />
      <VerticalFeatures />
      <Banner />
      <Footer />
    </div>
  );
}
Okay now we can work with this. First, let's create an interface for our data we'll be retrieving from the GraphQL API. This interface should be defined outside of the Base component function.
export interface GraphQLAPIProps {
  section:any,
  testimonial:any,
  offer:any,
}
Next, in the Base component function, we'll create a state that will hold our data.
const [data, setData] = useState<GraphQLAPIProps | null>(null);
If you're using Apollo, you may want to use the useQuery hook here instead. Check out our docs on working with apollo to learn more.
With our state declared, we can create a useEffect hook that will run on first render of our component. This will allow us to fetch our data as soon as the component renders, then set the data in our state.
Inside the Base component function, below your useState, enter the following code:
  useEffect(() => {
    (async()=>{
      const newData = await getData();
      setData(newData);
    })();
  }, []);
Because we're executing an asynchronous function, we must use an IIFE inside our useEffect method. Learn more about useEffect in the official docs.
You may have noticed a getData() method in our useEffect. We haven't defined that method yet, but that's going to be what we use to fetch the Shape Array data.
Outside of the Base component function, define a new asynchronous function called getData. It will execute a fetch request to your project's graphQL API, then either return the data or null.
Here's the code:
async function getData():Promise<GraphQLAPIProps | null>{
  try{
    const result = await fetch(`${process.env.NEXT_PUBLIC_GRAPHQL_ENDPOINT}`,
    {
        method: 'POST',
        headers: {
          'Authorization': `Bearer ${process.env.NEXT_PUBLIC_GRAPHQL_KEY}`
        },
        body: JSON.stringify({
          query: `query
            {
              getLandingPageArrayList {
                items {
                  _id
                  landingShapeArray {
                    ... on OfferExample {
                      callToAction
                      signupUrl
                      campaignId
                    }
                    ... on SectionExample {
                      headingExample
                      descriptionExample
                      backgroundImageExample{
                        sourceUrl
                      }
                    }
                    ... on TestimonialExample {
                      customerObject {
                        customerImage {
                          sourceUrl
                        }
                        customerName
                      }
                      quote
                    }
                  }
                }
            }
          }`
        })
    });

    const resultJSON = await result.json();
    const {landingShapeArray} = resultJSON.data.getLandingPageArrayList.items[0];

    return {
      section: landingShapeArray.find((item:any)=>item.headingExample!==undefined),
      testimonial: landingShapeArray.find((item:any)=>item.customerObject!==undefined),
      offer: landingShapeArray.find((item:any)=>item.campaignId!==undefined),
    }
  } catch(error){
    console.log("Error trying to get data", error);
    return null;
  }
}
In the above code, we do a fetch request to your project's graphQL API, passing our query as a string. If it succeeds, we convert the response into JSON and extract the first item in our array. We can do this because we only have on item in our LandingPageArray data.
If you have more than one item in your Shape Array, you'll have to get the ID of that item and pass it as an argument. You can find the ID of the Shape Array you want by running the code to fetch your shape array in the API Explorer.
Navigate to the API tab in your project's admin UI, then on the left you'll see the API Explorer option. Select that, and you'll be taken to a GraphQL playground, where you can run queries on your API Schema and get data back.
Enter the following code into the query field on the left:
{
  getLandingPageArrayList {
    items {
      _id
      _shapeName
    }
  }
}
Hit "Run Query" at the top left, and you'll see a list of all the items in your Shape Array, with their ID's and shape names.
{
  "data": {
    "getLandingPageArrayList": {
      "items": [
        {
          "_id": "0d25b458-904c-400a-995b-f9ef17c1ed22",
          "_shapeName": "LandingPageArray"
        },
        {
          "_id": "995bb458-904c-400a-45bb-f9ef17c1ed22",
          "_shapeName": "OtherArray"
        }
      ]
    }
  }
When you have the ID of the item you want, you can set the body of your fetch request to be this instead:
const result = await fetch(`${process.env.NEXT_PUBLIC_GRAPHQL_ENDPOINT}`,
{
  method: 'POST',
  headers: {
    'Authorization': `Bearer ${process.env.NEXT_PUBLIC_GRAPHQL_KEY}`
  },
  body: JSON.stringify({
    query: `query
      {
        getLandingPageArray(_id:"Your-Item-Id-Here"){
          landingShapeArray{
            ... on SectionExample{
              descriptionExample
              backgroundImageExample{
                sourceUrl
              }
              headingExample
            }

            ... on TestimonialExample{
              quote
              customerObject{
                customerName
                customerImage{
                  sourceUrl
                }
              }
            }

            ... on OfferExample{
              signupUrl
              campaignId
              callToAction
            }
          }
        }
      }`
  })
});
In the above code, be sure to replace "Your-Item-Id-Here" with the id for your item.
With that all set, you'll notice that if our fetch request fails, we return null.
To ensure our component reacts to this scenario, go back to the Base component function and add the following code above the return statement.
if (!data) {
  return <div>Could not load data.</div>;
}
Now, if our fetch request fails, it'll show in our template.
Adding data to the template
Now we just need to inject our data into our actual template.
The code that renders out our template is in the src/templates/Base.tsx file. If you open that file in your favorite editor, you'll find that it returns the following jsx:
<div className="antialiased text-gray-600">
  <Meta title={AppConfig.title} description={AppConfig.description} />
  <Hero />
  <VerticalFeatures />
  <Banner />
  <Footer />
</div>
If you followed our steps above, then you should already have code that gives you access to your data.
Now we'll add that data to the components we're rendering in our Base template.
First, pass the data in the props as shown below:
<div className="antialiased text-gray-600">
  <Meta title={AppConfig.title} description={AppConfig.description} />
  <Hero section={data?.section} />
  <VerticalFeatures testimonial={data?.testimonial} />
  <Banner offer={data?.offer} />
  <Footer />
</div>
With that done, let's edit our components so they can actually do something with the data.
Hero
Let's start with the Hero component. We're going to use the Section Example we defined in our Shape Array. Open src/templates/Hero.tsx in your favorite editor.
We're going to add a simple interface for the props we'd like to add:
export interface HeroProps {
  section: {
    headingExample: string,
    backgroundImageExample: {
      sourceUrl: string,
    }
    descriptionExample: string,
  }
}
This will allow us to pass our section to the Hero component. Now on our Hero component method, we'll define what we're passing in:
const Hero = ({section}:HeroProps) => (
  //jsx here
)
Now we can work with our section in our JSX template. We're going to add the data contained in our section object anywhere that seems appropriate. For this example, the code for the component is below:
const Hero = ({ section }: HeroProps) => (
  <Background background={section.backgroundImageExample?.sourceUrl} color="bg-gray-100">
    <Section yPadding="py-6">
      <NavbarTwoColumns logo={<Logo xl />}>
        <li>
          <Link href="https://github.com/ixartz/Next-JS-Landing-Page-Starter-Template">
            <a>GitHub</a>
          </Link>
        </li>
        <li>
          <Link href="/">
            <a>Sign in</a>
          </Link>
        </li>
      </NavbarTwoColumns>
    </Section>

    <Section yPadding="pt-20 pb-32">
      <HeroOneButton
        title={<>{section.headingExample || 'Loading...'}</>}
        description={section.descriptionExample || 'Loading...'}
        button={
          <Link href="https://creativedesignsguru.com/category/nextjs/">
            <a>
              <Button xl>Download Your Free Theme</Button>
            </a>
          </Link>
        }
      />
    </Section>
  </Background>
);
Done.
VerticalFeatures
The VerticalFeatures component is just this template's abstraction for a section of the page. We're going to open this file by navigating to src/templates/VerticalFeatures.tsx.
Next, in the VerticalFeatures function, we're going to delete the excess VerticalFeatureRow components. We only need one. Your JSX should look like this:
<Section>
  <VerticalFeatureRow
    title="Your title here"
    description="Loading..."
    image="/assets/images/feature.svg"
    imageAlt="Customer"
  />
</Section>
Now we're going to define an interface for our component's props. Outside of the render function, create this interface:
interface VerticalProps {
  testimonial: {
    customerObject: {
      customerName: string;
      customerImage: {
        sourceUrl: string;
      };
    };
    quote: string;
  };
}
This will allow us to define our props object in the VerticalFeatures render function:
const VerticalFeatures = ({testimonial}:VerticalProps) => (
  //code
)
With that done, we just add our testimonial info to the VerticalRow component we're rendering, using all of its own props that have been pre-defined in the template:
const VerticalFeatures = ({ testimonial }: VerticalProps) => (
  <Section>
    <VerticalFeatureRow
      title={testimonial.customerObject?.customerName || 'Your title here'}
      description={testimonial.quote || 'Loading...'}
      image={testimonial.customerObject?.customerImage?.sourceUrl || '/assets/images/feature.svg'}
      imageAlt="Customer"
    />
  </Section>
);
Banner
Finally, let's edit the Banner component.
Just like above, we'll navigate to src/templates/Banner.tsx.
First, let's create the interface for our props:
interface BannerProps {
  offer: {
    callToAction: string;
    signupUrl: string;
    campaignId?: string;
  };
}
This will allow us to define our props in the arguments of our component function:
const Banner = ({offer}:BannerProps) => (
  //jsx here
)
And here's what the final component function should look like:
const Banner = ({ offer }: BannerProps) => (
  <Section>
    <CTABanner
      title="Start your Free Trial."
      subtitle={offer.callToAction || 'Join now.'}
      button={
        <Link href={offer.signupUrl || '/'}>
          <a>
            <Button>Get Started</Button>
          </a>
        </Link>
      }
    />
  </Section>
);
Building your NextJS landing page
Now that everything is set up, it's time for the moment of truth: Building your project.
First, let's run it on a development server to make sure everything looks good. In your console, enter the following command:
npm run dev
Navigate to localhost:3000 and here's what you should see:

Beautiful.
Now go back to your console and type ctrl+c to shut down the dev server.
Enter the below commands to build and serve your static site:
npm run build
npm run start
You should see the same image as above. If so, congratulations. You just used a Shape Array.
And hey, since you're already using TypeScript, you should generate types for your GraphQL queries. Check out our Apollo Client doc to learn more.
Still need help? Get in touch with us.